Read on to learn some great techniques to create amazing AI art for UI/UX design using Midjourney.
There is a tonne of AI-generated images on the internet right now, but how well do text-to-image tools work for UI design? The answer is that you can get pretty amazing images to provide your “prompt” is accurate.
The AI Art Generative Tool from Midjourney is an incredible game-changer for maximizing your creative potential!
You may quickly generate incredible images with the assistance of this amazing technology, which uses artificial intelligence and machine learning.
The use of AI art in UI/UX design is completely revolutionary and offers incredible opportunities. Midjourney can provide hundreds of design possibilities in a matter of seconds, simplifying and optimizing the process for you. In this article, we’ll examine how artificial intelligence (AI) text-to-image converter may assist with your routine UI/UX design.
To make our analysis more specific, we will generate UI designs for a particular product (Groceries delivery app).
To get started with mid-journey, you need to join Discord. Visit https://www.midjourney.com/, click Join the Beta and follow the instructions mentioned there to create your account.
If you are new to Discord, firstly join Discord and create your account by visiting:
Let’s start with the basics:
WHAT IS MIDJOURNEY?
A San Francisco-based independent research lab called Midjourney, Inc. developed and maintains the generative artificial intelligence program and service known as Midjourney. Similar to OpenAI’s DALL-E and Stable Diffusion, Midjourney generates graphics using natural language inputs called “prompts”.
Plain text can be converted into images using text-to-image AI techniques like Midjourney, Dalle-2, and Stable Diffusion. With the right prompt, you will be able to generate new UI as well as improve your own User Interface designs.
Midjourney is a fantastic tool for designers since they can feed it style and design concepts to get new ideas and perspectives.
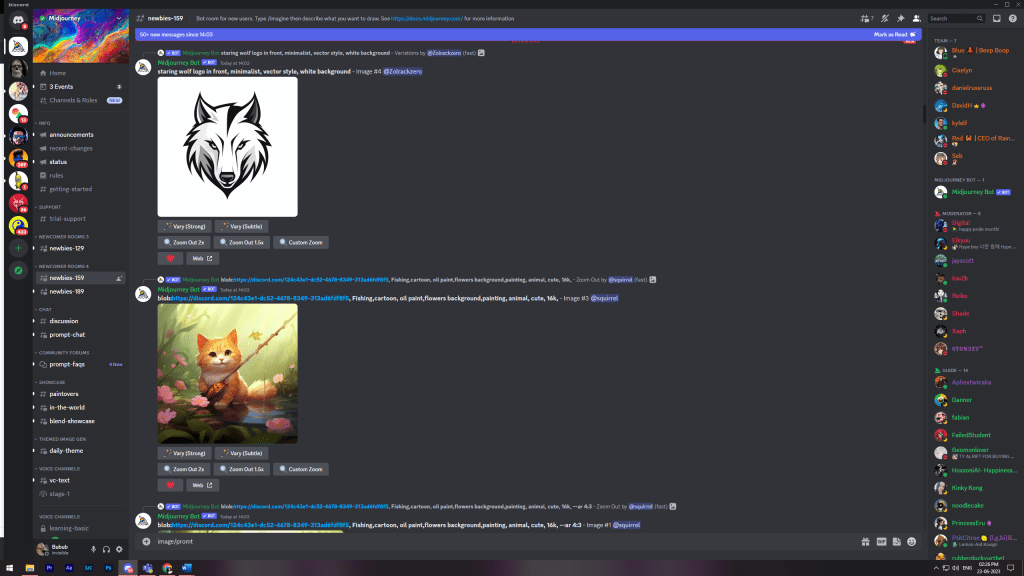
After setting up your Discord Account and adding Midjourney to it, in the Midjourney channel, you can see many newbies groups. Join any newbie group and start creating text-to-image by writing prompts as: /imagine (as shown in the image above).
HOW TO DESIGN UI USING MIDJOURNEY LIKE A PRO?
If you want to create an appealing UI design using Midjourney you must keep in mind the following points in mind:
1. Change the default settings
Midjourney by default is good, but why settle for good when you can get the best?
To get the best result from the Midjourney generative AI, you should adjust your settings. To do so, use the /settings command.
Once the Midjourney settings are displayed, turn on the “MJ version 5.1” (click->green button) to use the latest version of Midjourney, Style(low, med, high, very high) depending upon how stylish or modified image you want, and “Remix mode” to easily modify the versions of the images you get.

The –v5 mark will now appear at the end of every prompt you type, and you may now modify the prompts for the images you created with Midjourney.
2. Good Prompt Template
Midjourney is an AI that performs activities in response to inputs, often known as prompts. You can use any words to create the exact image you want. However, it is undeniable that the quality of the output increases with better-comprehended prompts.
Images produced by simple and brief Midjourney prompts are often drawn directly from the Midjourney training data, however, images produced by a more thorough question can be completely new and original.
Bad prompt: Groceries store app UI
Good prompt: /imagine prompt: UI/UX design of [SCENE DESCRIPTION], for [APP/ WEBSITE/ TABLET/YOUR CASE], [STYLE (MODERN/MINIMALISM/URBAN)], [COLOR PALETTE], PARAMETERS –V5
To unlock the full potential of Midjourney for creating UI designs, modify your prompt as per your needs, pinpoint the basic needs, including negative keywords and set quality strength, etc., which is what we’ll do in the next tricks.
If you find it difficult to create productive prompts, no need to worry, you generate prompts using ChatGPT easily, which will further reduce your burden. Read about ChatGPT.
3. Explore Color Pallets
Right colors may enhance your user interface design significantly, especially if you want to emphasize and highlight your brand’s identity, set the mood for your audience, or convey a message, among other things. It is advised to always incorporate color schemes in the prompt template to generate an image that will provide an amazing UI Design.
For this, you have to think outside the box and not just stick to the old ways. Additionally, the palettes don’t have to just color; you can experiment with various additions to your design, such as textures: wood, marble, glass, and hues: pastel sunsets, ocean blue, sea green, and other schemes.
4. Include important Elements
Do you feel that something is missing? Yes, the major elements that you want to incorporate in your design are still missing in the prompt. Adding important elements can help transform your imagination into life; all you have to do is add them to the prompt.
For example, I am designing an online grocery delivery app that focuses on quick delivery. So the key element here is quick delivery, I should add specific words, such as quick/fast/15-minute delivery and everything related.
5. Negative prompting
We add the -no parameter when we don’t want a particular thing or want to exclude certain elements in our final image.
For example, if your groceries delivery app is only vegan you can include no parameters like – no meat, no dairy, no non-veg, etc. in your prompt.
6. Add Weight to Keywords
The next method involves grabbing users’ attention by generating an image that is appealing to the customers and popping out to highlight your brand or product. Increasing the weight of your keyword will provide a similar result. But the question is how to do this.
You can emphasize or highlight a specific object in a complex prompt that comprises multiple objects by using:: followed by a number.
After the keyword, you must type::2. (Raise the amount as per your need. A higher weight indicates that a keyword will be given more attention. You’ll notice better results as per your imagination after adding weights to the keywords.
For example, if you want to highlight organic fruits and vegetables or antibiotic-free poultry in your groceries delivery app. You must add weight to the keywords: organic, fruits, vegetables, and poultry. As a result, the keywords with weights appear more noticeable in the image generated, which can easily capture one’s eyes.
7. Personalized Designs
The secret to creating a personalized UI design is to include an artist’s name in the prompt template For instance, I’d like my app UI like some famous designers like Saul Bass, Andy Budd, etc.
8. Stylize
Stylize determines how artistic a Midjourney image will be.
Midjourney AI is trained to generate art, designs, color schemes, and compositions. We can control these aspects by using –stylize or –s followed by a number: –s [0-1000].
The greater the number, the more artistic will be your result image, however, it might be less related to the prompt. Lowering the number will generate an image just the way you asked in the prompt, however, it won’t be much artistic or stylized. So, try to strike a sweet balance between the STYLE and PROMPT to get the desired result that is stylized too.
By default, the average level of stylization is set to –s 100.
9. Ratio
Try out different aspect ratios (ar) to generate your image using Midjourney. The default is square, but you can make things taller or wider by using the –ar parameter: –ar 2:3, –ar 3:2, –ar 9:16, –ar 16:9.
10. Quality
Control the quality using the –q parameter. The higher the quality, the more detailed and realistic your picture will be, making it great for portraits or images with intricate details: — q 0.25, –q 0.5, –q 1, –q 2. It’s important to remember that making a drawing with higher quality may take longer.
11. Chaos
Chaos determines the level of variation in the results displayed in the grid. Higher values of this parameter will yield more unusual and unexpected results, while lower values have more reliable, repeatable results. The default value is 0: –c [0-100]
HOW TO APPLY MIDJOURNEY UI DESIGN ON SWING2APP?
While creating your no-code app on Swing2App, you can easily upload the Midjourney-generated UI.
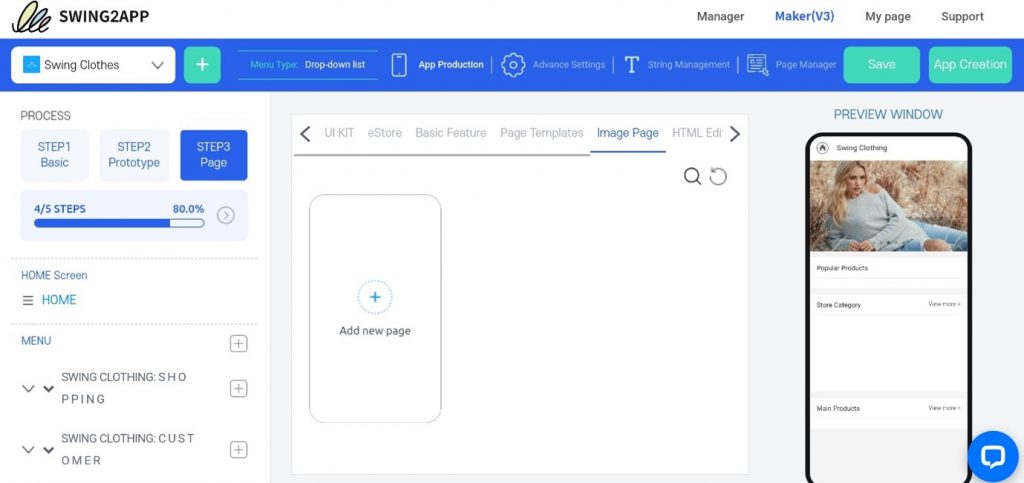
1. Create your app, after getting done with Step 1 Basic and Step 2 Prototype, go to the Step 3 Page.

There select Image Page, click on and add a new page.
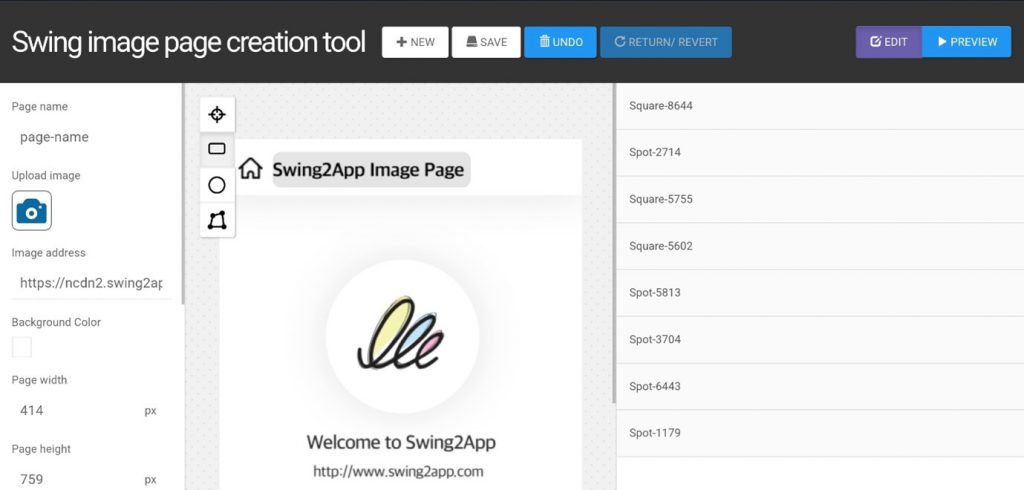
A new tab will open in the window, where you can see multiple options including uploading an image. Simply click on upload an image and upload the UI image from your folder. Then you can easily add menu links to various icons, or buttons as per your UI, this can be done by adding a shape over the desired area and setting what feature you want over there.

CONCLUSION
Midjourney is a great brainstorming tool for all the UI/UX designers out there, there are many ways in which you can leverage this technology and generate better output.
Start by creating a basic UI for your innovative app idea, and then upload it on Swing2App to create a free app that works on both Android as well as iOS devices.
Join Swing2App no-code journey now!

