Designing and developing your mobile app is only half of the job. If you want your mobile app to be successful, you must ensure that your Apple app store product page is thoroughly designed to attract new users and retain existing ones. So, how can you improve the performance of your iOS app?
The answer is iOS 15 Product Page Optimization (PPO), a native A/B testing tool for the App Store that can help with app marketing. This enables App Store developers to test up to three different treatments of their app product page to determine the best-performing option. Apple’s Product Page Optimization (PPOs) feature could assist you in improving your app marketing approach and generating more organic growth.
It is, however, easier said than done. How do you determine which settings and configurations produce the best results? How can you be certain that your product page displays the best app icon, app previews, and screenshots? Let’s find out more in today’s article.
WHAT IS iOS 15 PRODUCT PAGE OPTIMIZATION IN APPLE APP STORE?
Apple Product Page Optimization allows you to optimise your creative assets for mobile apps using native A/B testing. This was a huge step toward reducing reliance on external A/B testing tools and more closely aligning with the functions provided by Google Play Experiments.
App marketers can conduct each test for up to 90 days to target specific locations. You can also select the percentage of your audience that would see your test, allowing you to focus your efforts more effectively.
This enables you to compare the performance of each of your treatments to the performance of your default App Store product page or store listing, offering valuable information into impressions, downloads, and conversion rates. These metrics will provide you with useful information on the best creatives to employ when promoting your app and which will result in the most conversions.
MAIN PRODUCT PAGE VS iOS 15 PRODUCT PAGE OPTIMIZATION
It’s critical to understand the difference between the main product page and the Product Page Optimization function. The main product page is your default app store listing page in App Store, which all consumers see when no paid ads are happening. When you use the Product Page Optimization function, visitors to your store’s listing will be directed to either your default product page or a treatment page (if using iOS 15 Product Page Optimization).
WHICH iOS ELEMENTS CAN YOU TEST WITH iOS PRODUCT PAGE OPTIMIZATION?
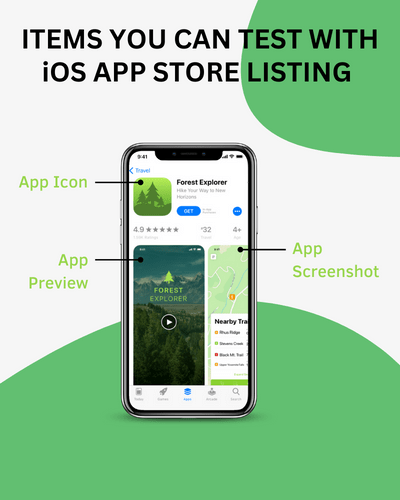
You can test three distinct app creatives on the App Store using iOS 15 Product Page Optimization –
- Screenshots
- app icons
- app preview videos
You can build three alternative versions (treatments) of your default product page with iOS 15 Product Page Optimization (PPOs). Similar to A/B testing in Google Play, those treatments are being tested directly in the Apple App Store versus the original store listing.
You can specify the percentage of users to whom the treatments will be shown at random, as well as the traffic allocation for the three various versions. Tests might last up to 90 days. You can also localise the test in multiple languages, but only for those for whom you’ve established a local app page. Last but not least, you must submit the product page test assets for evaluation, apart from the app binary or app build. When A/B testing app icons, you must submit the different versions in the app binary and go through the usual app build approval process.
GOOGLE PLAY EXPERIMENTS VS APPLE’S PPO
The main difference between Google Play Experiments and Apple’s Creative Assets is that Apple only allows you to test creative assets (on Google Play, you can also A/B test the short and long descriptions). PPO also needs you to submit your creative experiments for Apple’s review, whereas Google Experiments allows you to build up your tests whenever you want. Furthermore, you do not need to release a new app version every time you test your Android icon, whereas iOS icon experiments need you to include your icon in the binary of your new app build. The maximum duration of A/B tests on the App Store is 90 days, whereas A/B tests on Google Play can be run indefinitely.
WHY A/B TESTING? : BENEFITS OF APPLE PPO
Product Page Optimization is a tool that will assist ASO and app professionals in understanding how different page elements influence App Store conversion rates.
In the App Store, A/B testing and app experimentation have always been limited. Until recently, app marketers had to rely on third-party technologies or undertake sequential analysis to see how something worked before and after a test. Until iOS 15 PPO, the closest feature to A/B testing and PPO was Creative Sets (which were replaced with Custom Product Pages), which needed the use of Apple Search Ads.
App publishers can finally have a free and native product that uses App Store data and includes dedicated analytics with iOS 15 PPO.
And, like with A/B testing on the Play Store, there are several possibilities and test scenarios:
- Experimenting with new colours and palettes for your assets
- Testing various messages, screenshot alignments, and styles
- Highlighting a specific feature or culturally relevant content in a certain region
- Introducing new features and monitoring their performance
- Using videos instead of screenshots or vice versa
Anything that is important to your potential users and has the ability to influence your visitor-to-install conversion rate should be included in your App Store A/B testing plan.
HOW TO SET UP YOUR FIRST iOS 15 PPO TEST IN APP STORE
We’ve put up a detailed checklist to help you conduct your first iOS 15 product page optimization test smoothly:
STEP1: TEST CONFIGURATION
Login/Sign in to your App Store Connect account
Log in to https://appstoreconnect.apple.com/ with your email password.
Choose your app
Go to the “My Apps” section and select the app you want to optimize for (if you have multiple apps).
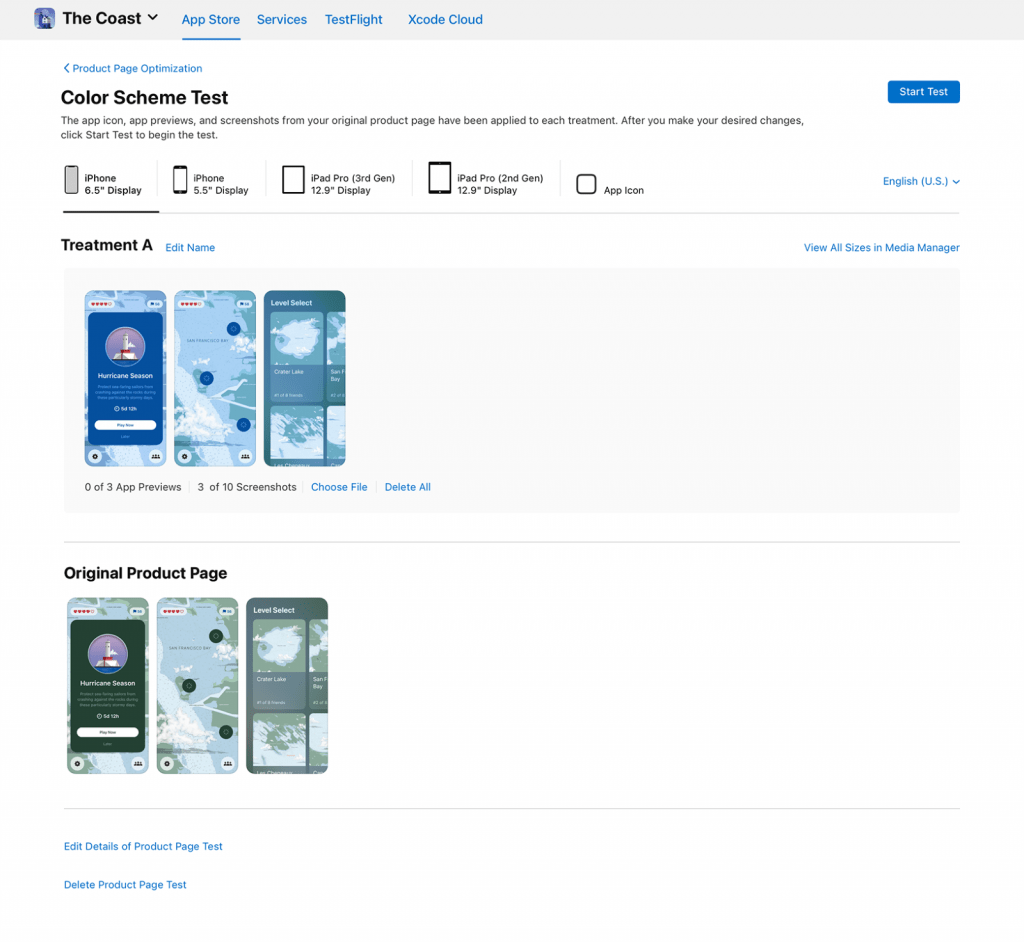
1. CREATE TEST
Select “Product Page Optimization” from the left menu to start creating a test. If you haven’t already, click “Create Test,” or click the plus (+) icon next to “Product Page Optimization.”
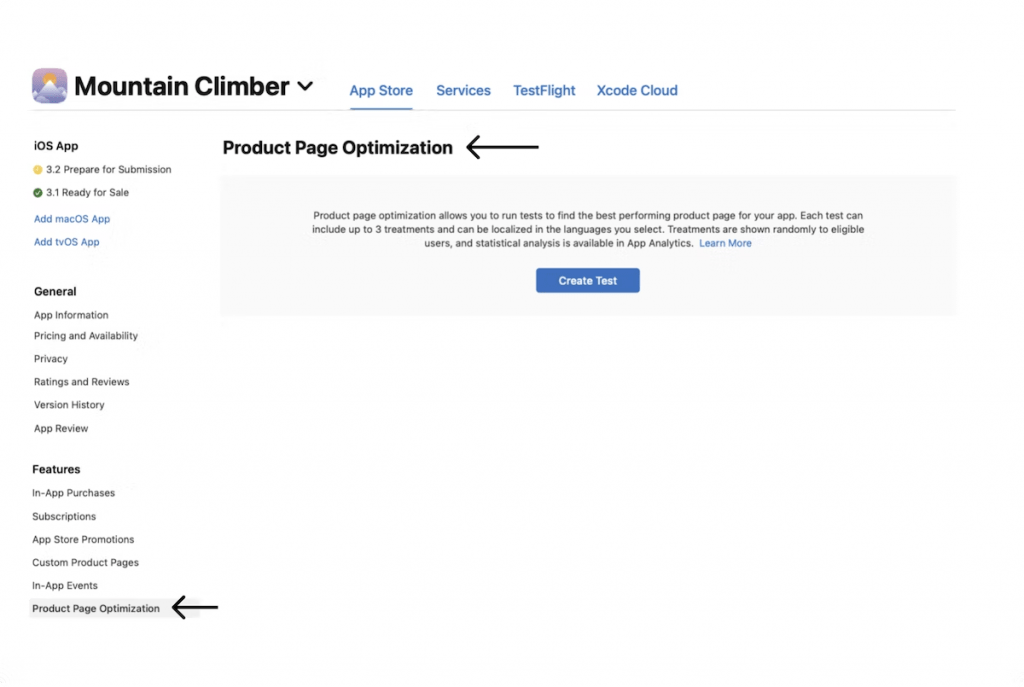
2. GIVE YOUR TEST A NAME
Make up a test name (up to 64 characters). Make it detailed so that when you view results in App Analytics, you can quickly recognise your test. “Valentine 2023 Screenshot Characters Test with 4 Characters,” for example.
3. CHOOSE THE NUMBER OF TREATMENTS
You can choose up to 3 treatments.
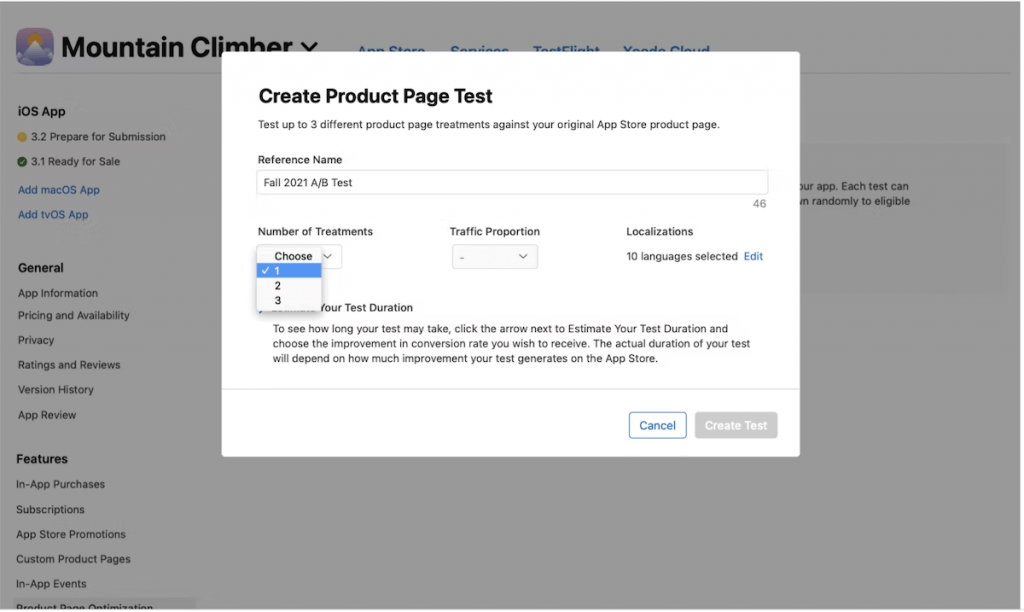
4. DETERMINE YOUR TRAFFIC ALLOCATION
Choose the percentage of users who will be shown a treatment instead of your original App Store product page at random. We propose that you evenly distribute visitors between your default product page and the various treatments.
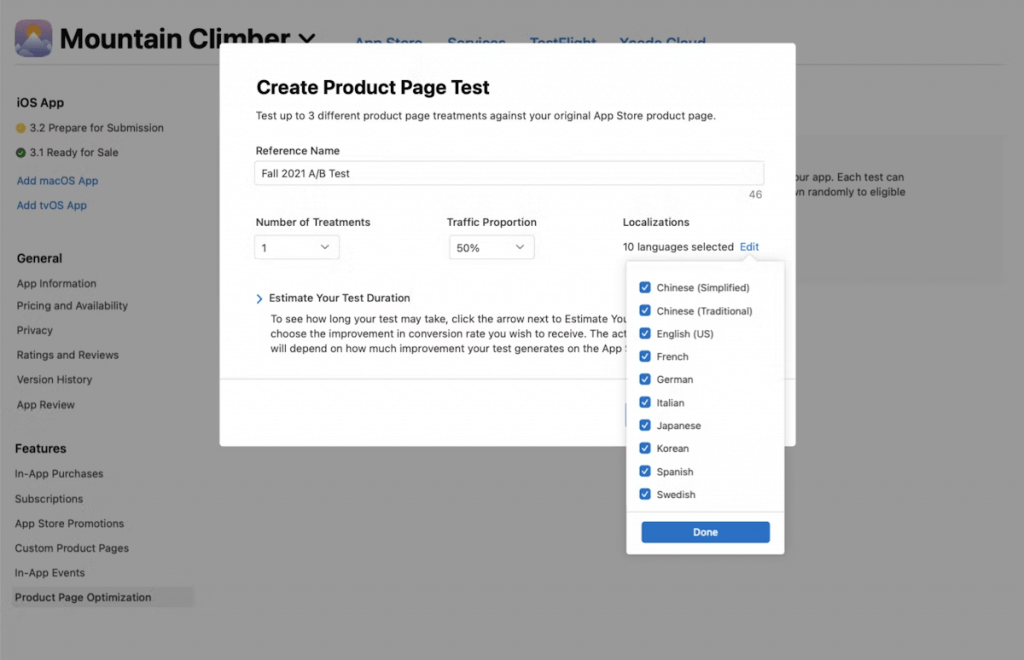
5. SELECT THE LOCALIZATION
Select the region if you are localising the test. Only locations from the current app version are eligible for inclusion in the experiment.
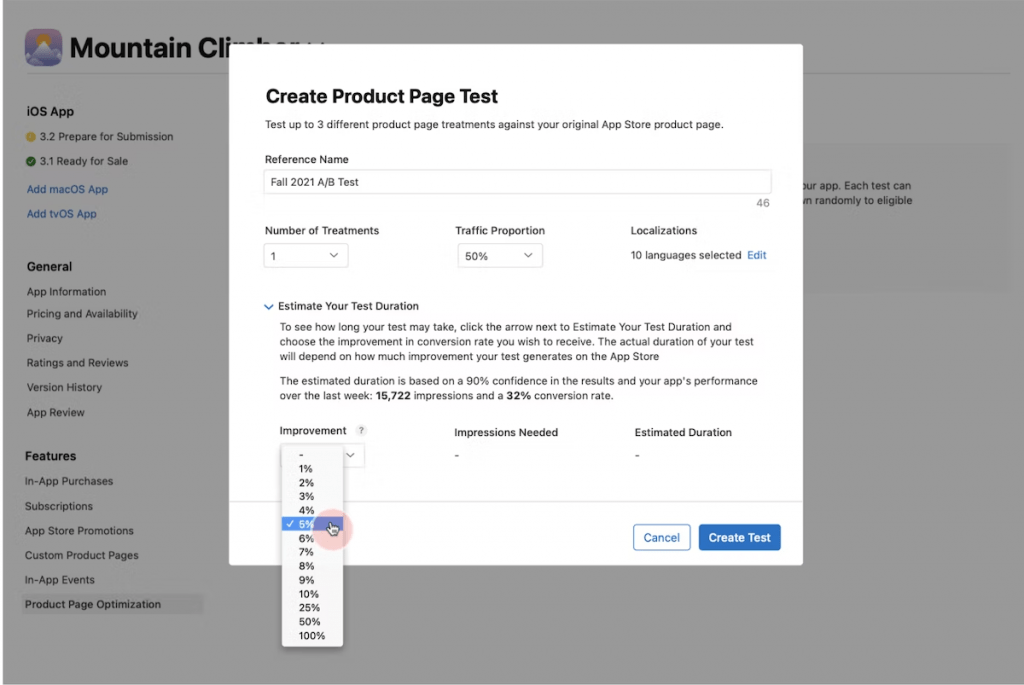
6. CALCULATE YOUR TEST DURATION
To estimate the time required to reach your objective, click “Estimate Your Test Duration” and select the conversion rate improvement desired. The test will run for a maximum of 90 days to assist you in determining whether you have achieved your intended outcomes within that time frame. You can also end the test manually within that time frame. It is important to note that the more treatments you add to a test, the longer it may take to get definitive findings.
7. LAUNCH YOUR TEST TREATMENTS
Click the “Create Test” button. Limit the amount of elements in a treatment that you want to change at any given time so that you can quickly identify the one that actually influenced the results. Before you may use any of your creative assets, App Review must approve them. However, unless it is an app icon, no new version is required to begin the test.
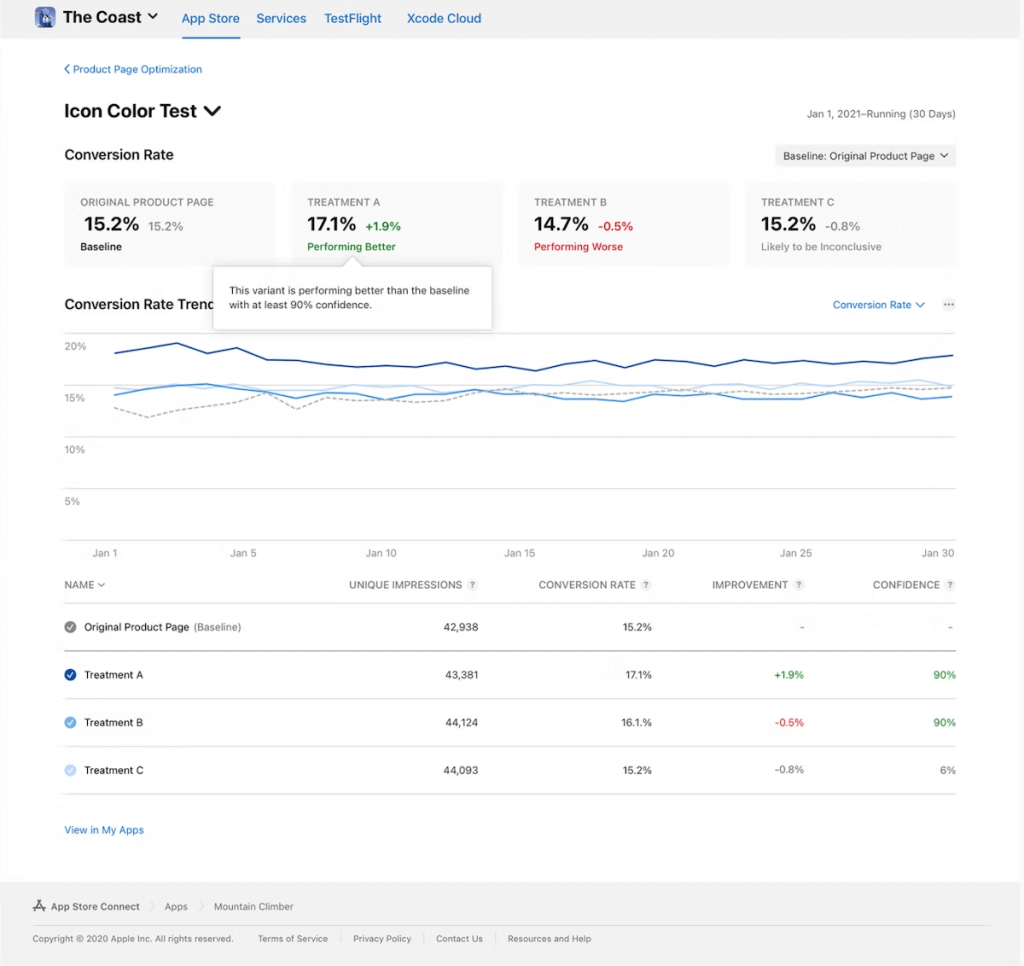
STEP2: MONITOR THE TEST PERFORMANCE
The information on the test progress you previously put up will be available in the App Analytics section of App Store Connect. You may compare impressions, conversion rates, percentage improvements, and confidence levels to the main product page.
If you have several testing treatments, you can compare their performance.
The App Store will also provide additional information, such as if the test requires more data to be collected and which treatment works the best.
STEP3: APPLYING THE WINNING TREATMENT
The final step is to decide whether you want to continue with the existing product page or use one of the testing treatments. The test will finish if you apply a treatment.
Based on the results of your tests, you may want to apply a treatment to your original product page so that it appears to all App Store visitors. Applying a treatment while your test is still ongoing will result in the termination of the current test. As a result, before rushing to adopt a treatment or terminate a test, we propose waiting and observing whether at least one treatment outperforms or is worse than the existing one.
To verify that the treatment variant outperformed your main product page, use a 90% confidence interval to determine which option is considered the winner.
A/B TESTING CHALLENGES WITH PRODUCT PAGE OPTIMIZATION IN THE APP STORE
Although long anticipated, A/B testing on the App Store has yet to live up to many developers’ expectations. Instead, App Store developers appear to be facing a number of challenges:
- Only App Store users with iOS 15 or later will see product page optimization alternatives. Users who arrive via external channels or older versions will be directed to the default product page.
- Before testing, the App Store must review all test treatments (icons, screenshots, and app previews), which can take up to 24 hours. App icons must be included in the next version update’s app binary.
- A product page test can only be performed if your app development is “ready for sale.”
- Product Page Optimization (PPOs) will be available throughout the customer journey. Because the icon variants exist in the app binary, the variant customers see in the store will be the same one they see on their phone after downloading the app.
- You can only perform one test at a time.
- Your test will be terminated instantly if you submit a new app version. This is a challenge for teams that have a one- or even two-week delivery cycle. Every new version release will automatically terminate any running tests, significantly reducing the time required for your test to achieve statistical reliability.
- If you run a test for many regions, you won’t be able to tell them apart in reporting. So, if you want to better understand test results by locale, you must write a separate test for each region. Because you can only perform one test at a time, you will have to complete this in order, which can take a long time.
- Tests have extremely low confidence intervals, making it difficult to draw any conclusions and determine whether to use one of the tested versions. We recommend running A/B/B tests to aid with low confidence issues. This implies you design a test with three options, two of which are identical. If both “B” variations produce identical findings, you can be more certain about the possible impact.
BEST PRACTICES FOR APP STORE A/B TESTING
If you’ve been doing A/B testing for a while, you probably already have a solid idea of how to approach it and what to pay attention to.
Nonetheless, let us outline the key points and adapt them to the App Store’s characteristics.
1. While running your tests, don’t make too many changes.
Make your control group as consistent as feasible. Although you won’t be able to alter metadata without interrupting the Product Page Optimization (PPOs) test, keep the paid campaigns consistent so that the traffic sources don’t shift too much.
2. Understand what you are testing
Always think about what you’re going to test and why. And, especially in the App Store, be careful of the limitations we already discussed.
3. Plan well in advance
To get the most of Product Page Optimizations, you must plan your app releases and consider the tests you will conduct in between. Prepare your testing assets ahead of time so that you may take advantage of the gap between two app submissions.
4. Take caution when testing app icons
Testing app icons with PPOs is difficult and time-consuming. Furthermore, because you won’t know the traffic sources for your treatments, you may receive inaccurate outcomes. App Store Browse users, for example, often convert at a lower rate than App Store Search users. If your treatments receive a large number of Browse users (in the event that your app is featured), the outcomes may appear better than they are.
5. Before applying the results, consider the audience size.
As previously stated, Product Page Optimization (PPOs) require a sufficient amount of data to make test results meaningful and to identify a clear test winner. Many of the tests you will do may require higher confidence, so keep this in mind when considering results implementation.
6. Follow the general testing guidelines.
While there is a lot of guidance on how to perform A/B testing, you need also follow the basic rules while employing PPOs:
- Keep a close eye on your competition and schedule testing iterations depending on market trends.
- Pay attention to your present traffic sources and distinguish between them to determine which traffic source is most relevant to your test findings.
- To counter the limits of Product Page Optimization (PPOs) analytics, concentrate on one or a few highly comparable localizations.
CONCLUSION
Product Page Optimization is yet another excellent tool for A/B testing. Together with Google Play Store listing experiments, they enable you to conduct native A/B testing, which is not possible with other tools. As a result, PPOs should be an essential component of your app store optimization and conversion rate optimization efforts.
Product Page Optimization (PPOs) have several limits, but that doesn’t imply you shouldn’t utilise them. PPOs can provide a range of helpful insights if you plan appropriately, understand your testing objectives, and use other tools to solve restrictions.
