Unlike websites, push notifications feature is in-built in mobile apps, helping businesses promote personalized content among the users to gain engagement. In fact, companies can increase the retention rate by a staggering 190% by only sending one or more push notifications within the first 90 days of app download.
{Also read: How to turn your website into a mobile app with push notifications?}
To know all about push notifications and how a business can cash big with them, refer to our detailed article.
For someone looking to create an app without any coding experience and for free, Swing2App comes as a potential solution delivering not just any app, but a remarkable Android and iOS app with push notifications.
To get you a clearer picture of how the push notification feature works and how you can integrate it into your business app, we will go through three use cases.
These examples will work as guidelines to DIY your mobile app push notifications with Swing2App.
Use Case 1: Tech Blogging App
The main function of this type of app is to give a platform to writers and readers to share and access blog/article-form content.
Once a blog is published by the author, it will get saved in the library. However, without any updates from the app, how do you suppose the users will know that a blog has been published which might be of interest to them?
We can’t just leave the engagement at the mercy of the sheer will of users to open the app once in a blue moon all by themselves to see what’s new. So, we integrate push notifications into the app to allow the admin to share relevant and personalized updates.
The admin can send push notifications in multiple ways. Depending on the need, they can be personalized, send in bulk or in specified groups.
Check out tutorial for it:
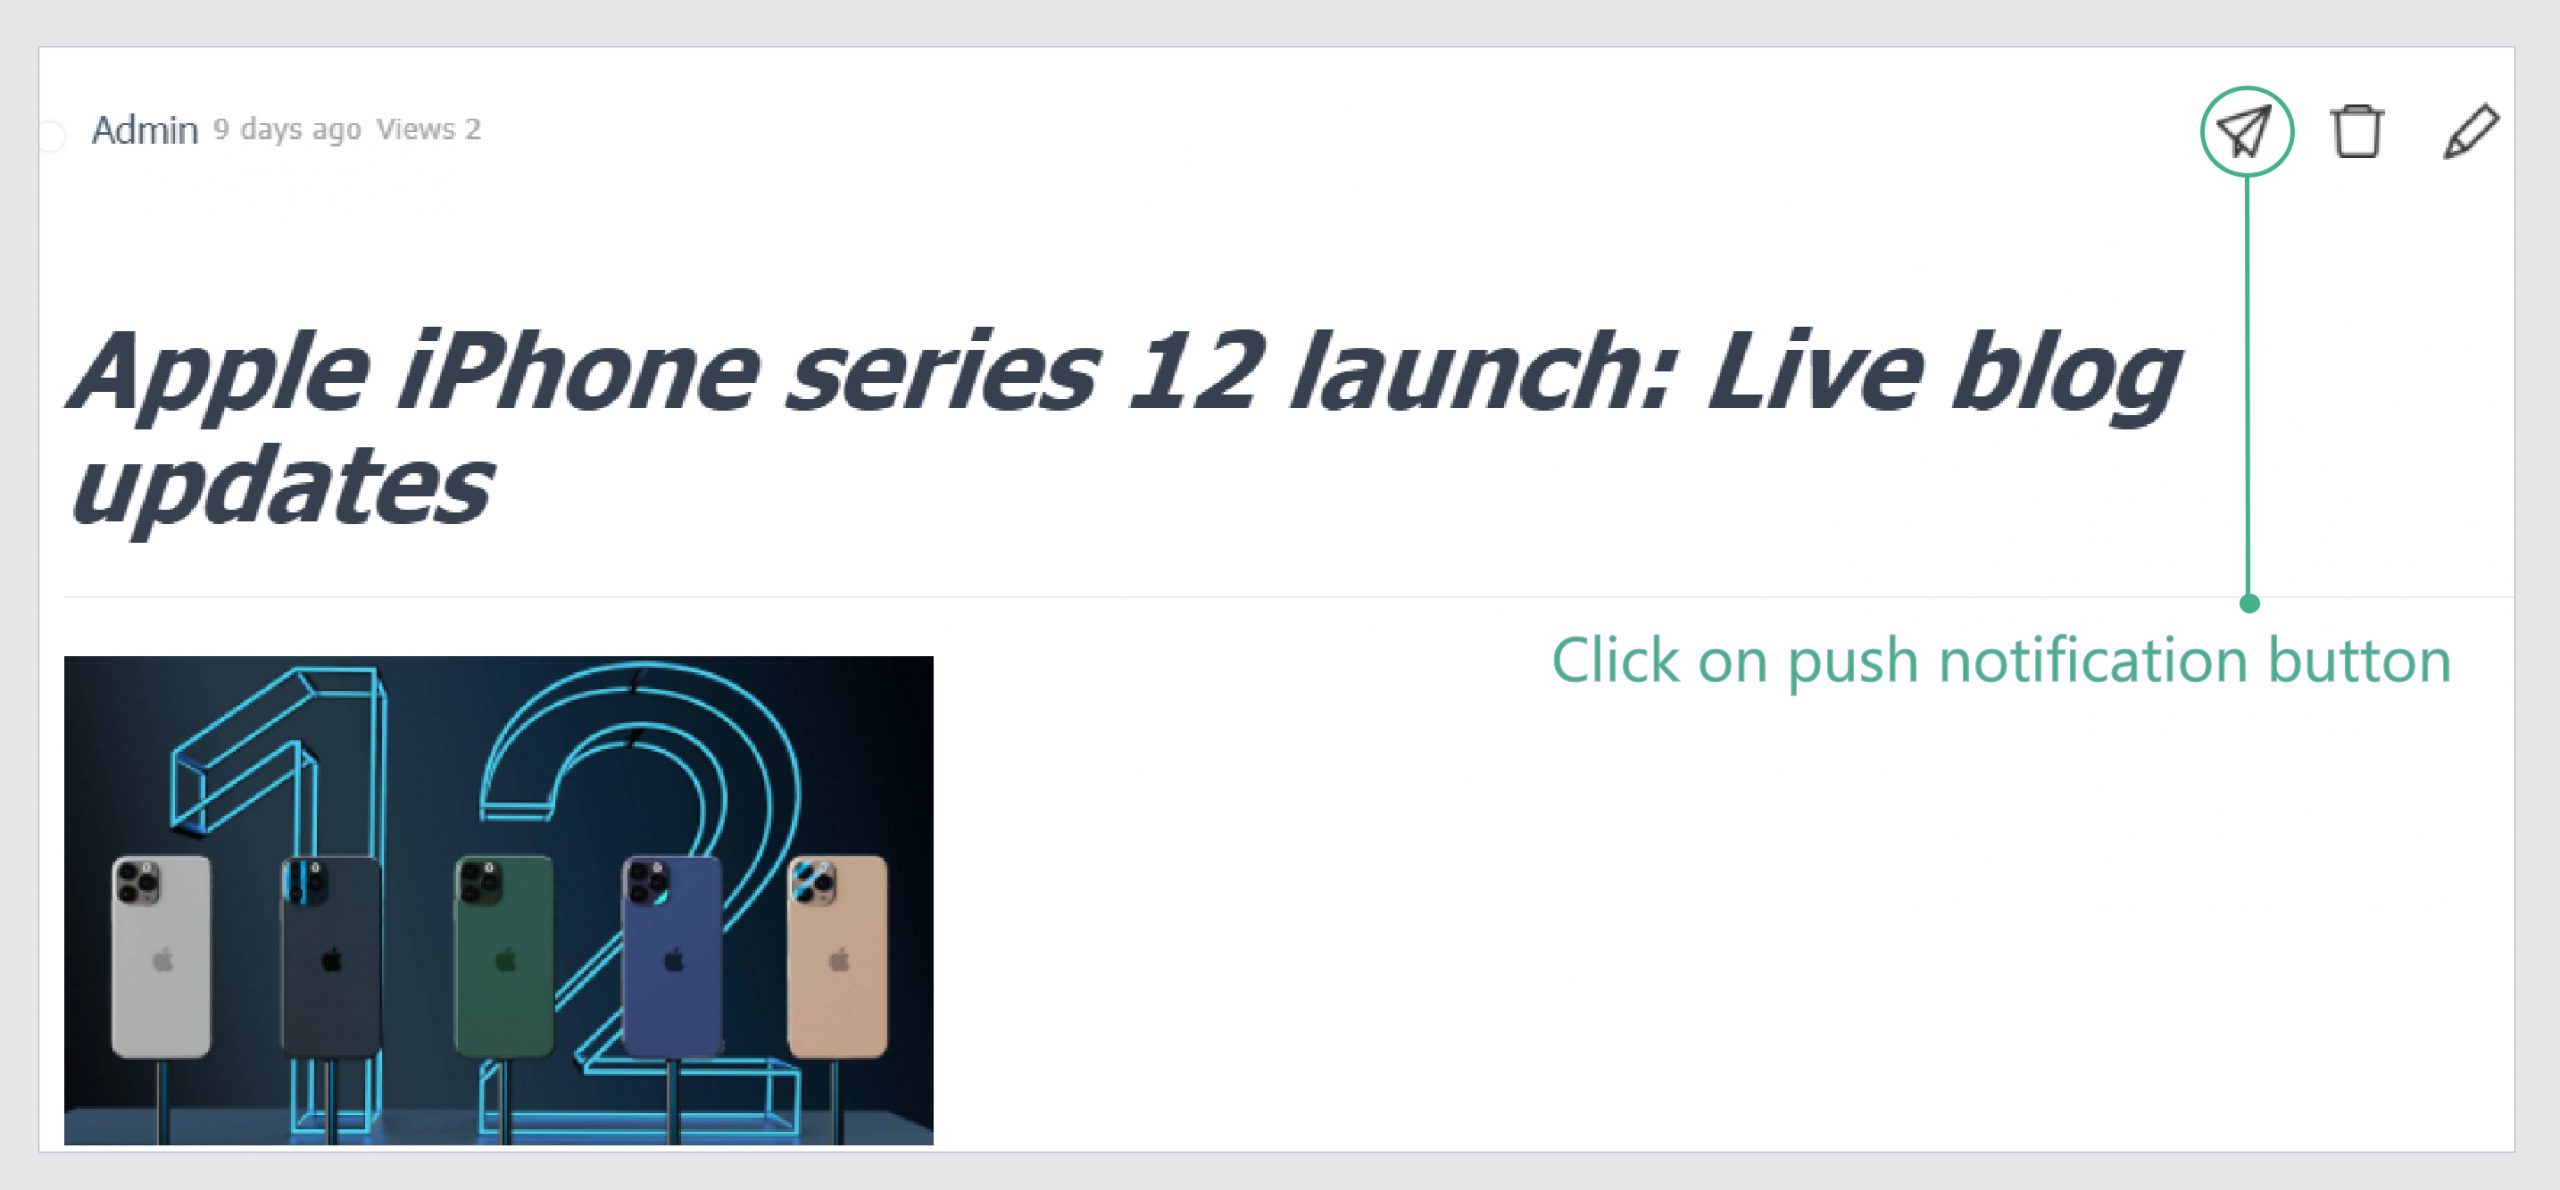
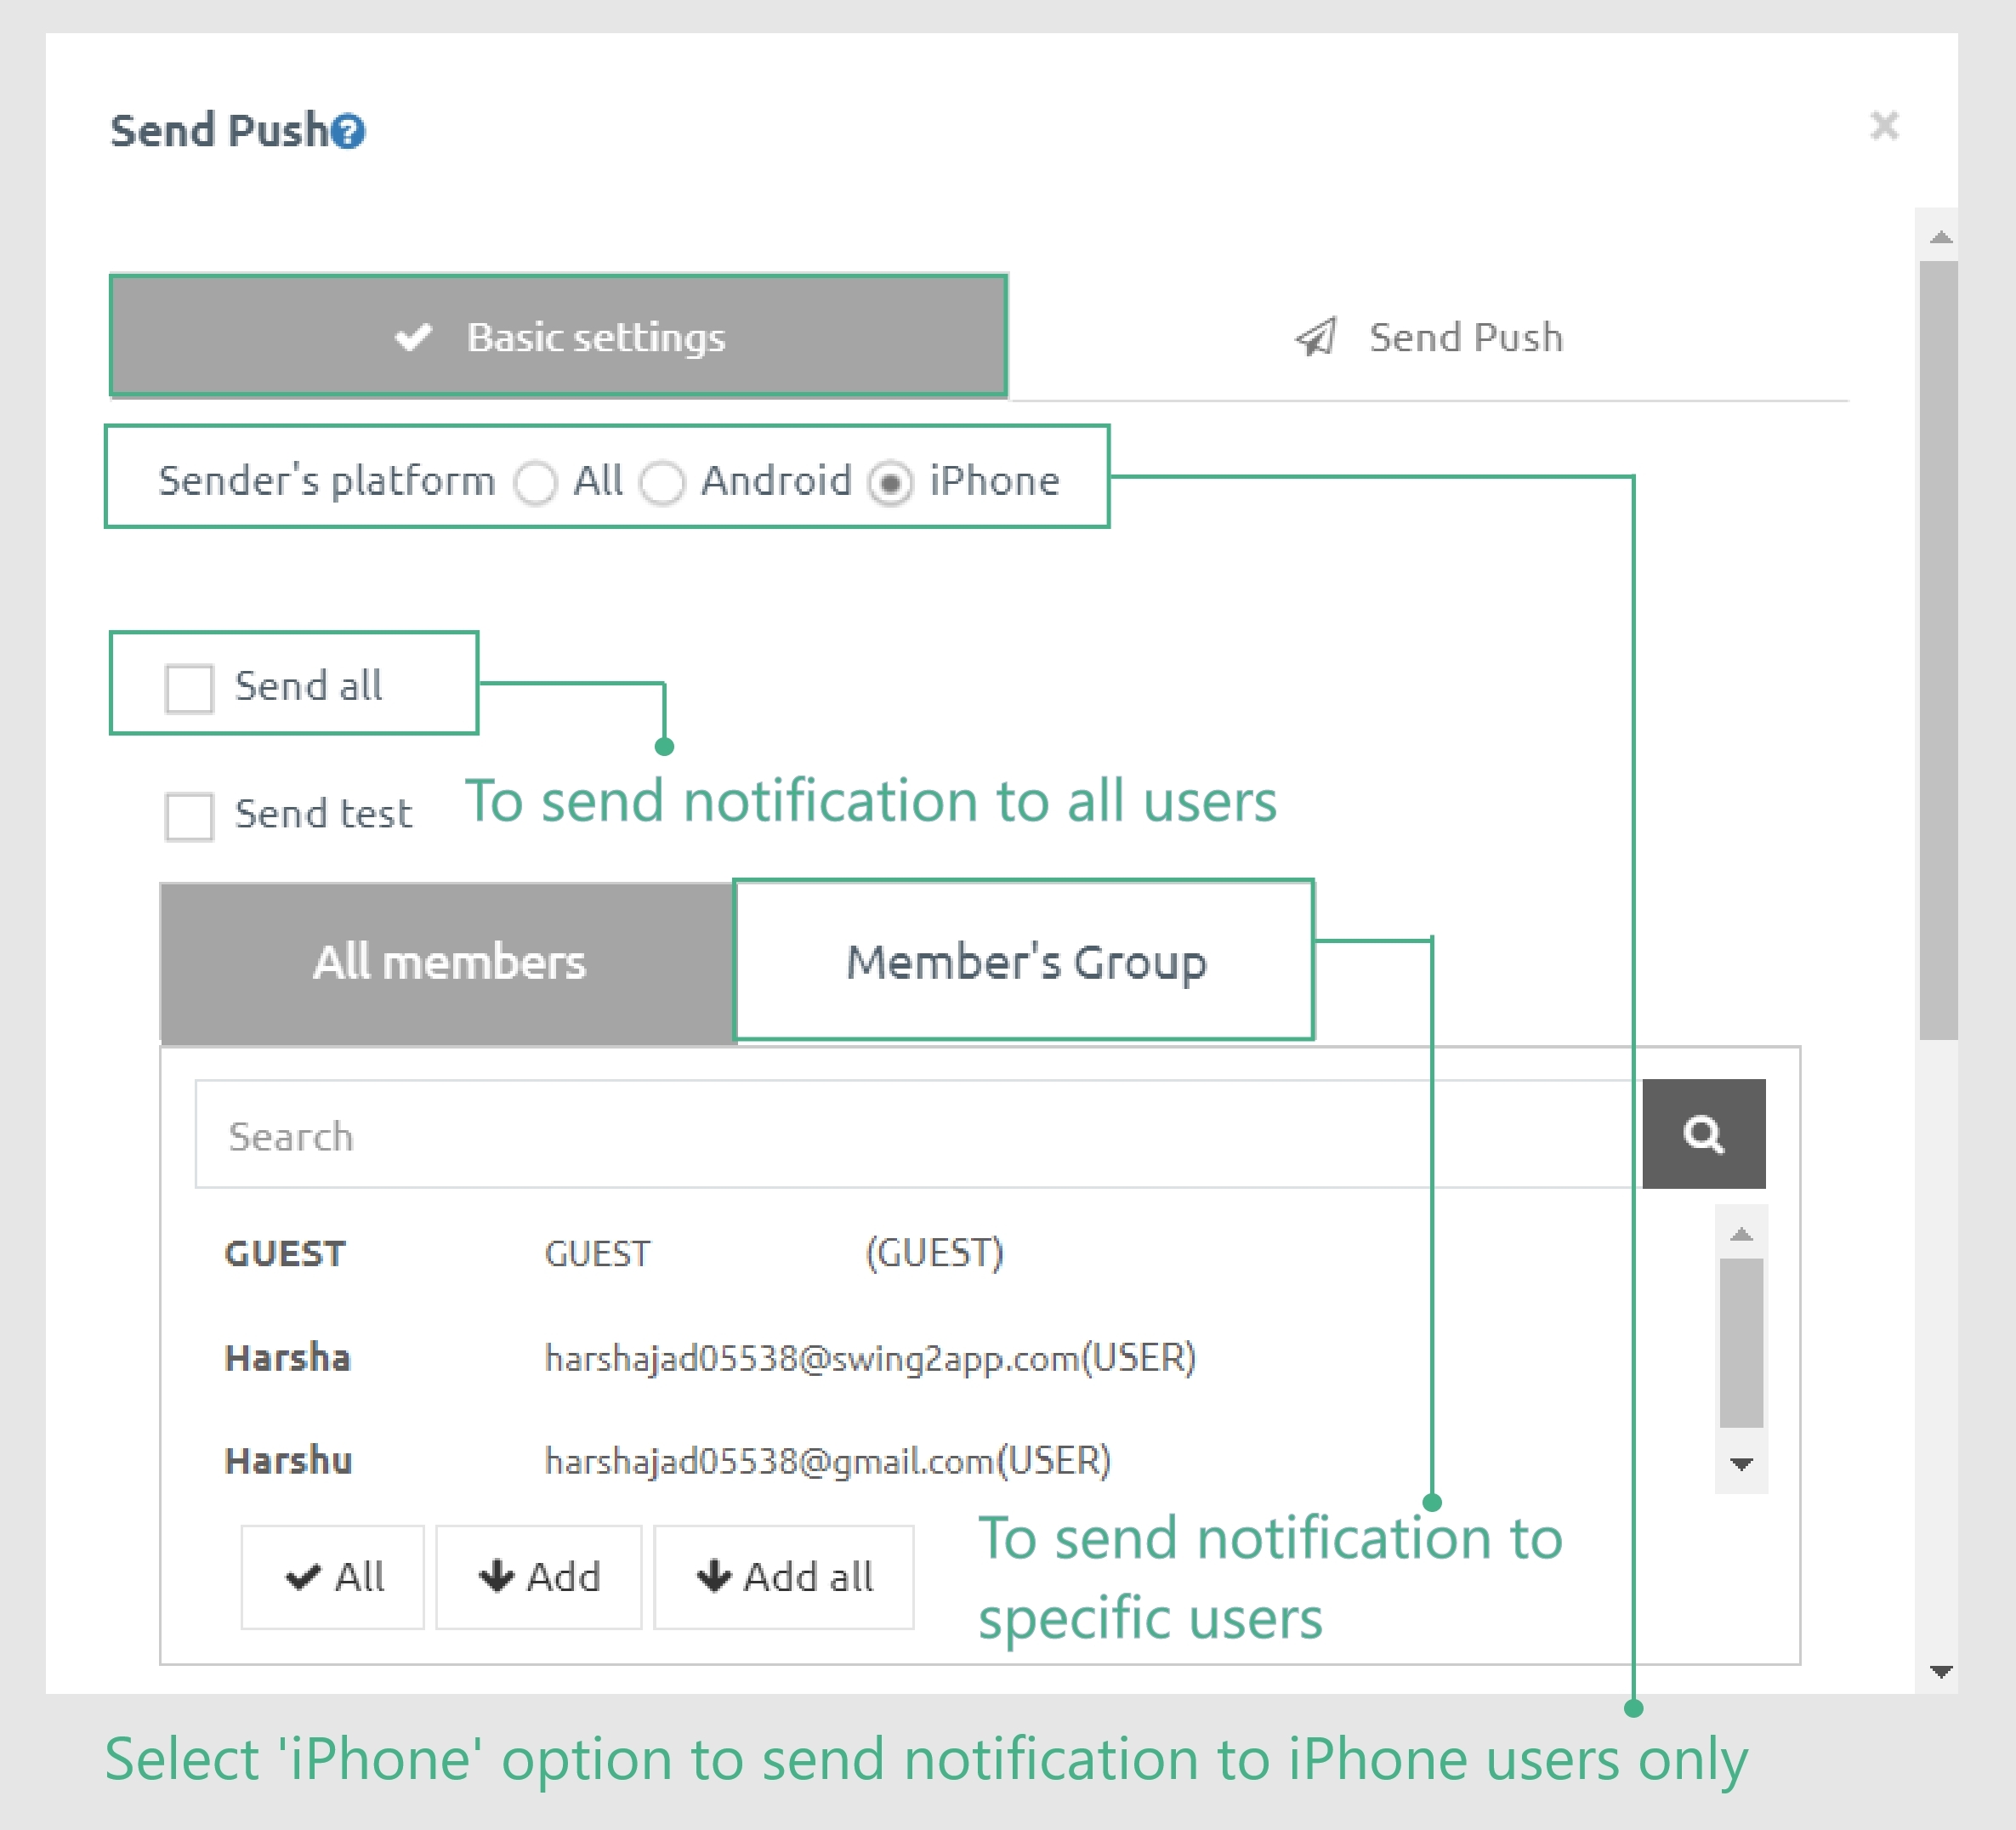

For instance, in the image above, the admin has published a blog on iPhone update. Understandably, the targeted audience will be iOS users.
Based on the information of users operating on different devices, the admin can share push notifications about the new article with only iPhone users or even hand-pick the selected few.
How to customize push notifications?
- In the ‘Sender’s Platform’ section, admin can choose the iPhone only option to release updates to only the iPhone users. To send the update to all the users, choose the ‘All’ option; to select specific customers, go to the ‘members group’ option.
- Now, on the ‘Manager Page’, navigate to the ‘Posts’ option.
- Then select your Created Board and create your post by filling the necessary information. You can also add an image to make it more attractive for users (refer to the size recommendation).
- You can then schedule the push notification successfully or send it in real-time by opting for ‘Send Push’.
Useful links: How to create bulletin board https://support.swing2app.com/documentation/appmanage/board/create-bulletinboard/
How to enter post in bulletin board https://support.swing2app.com/documentation/appmanage/board/post-write/
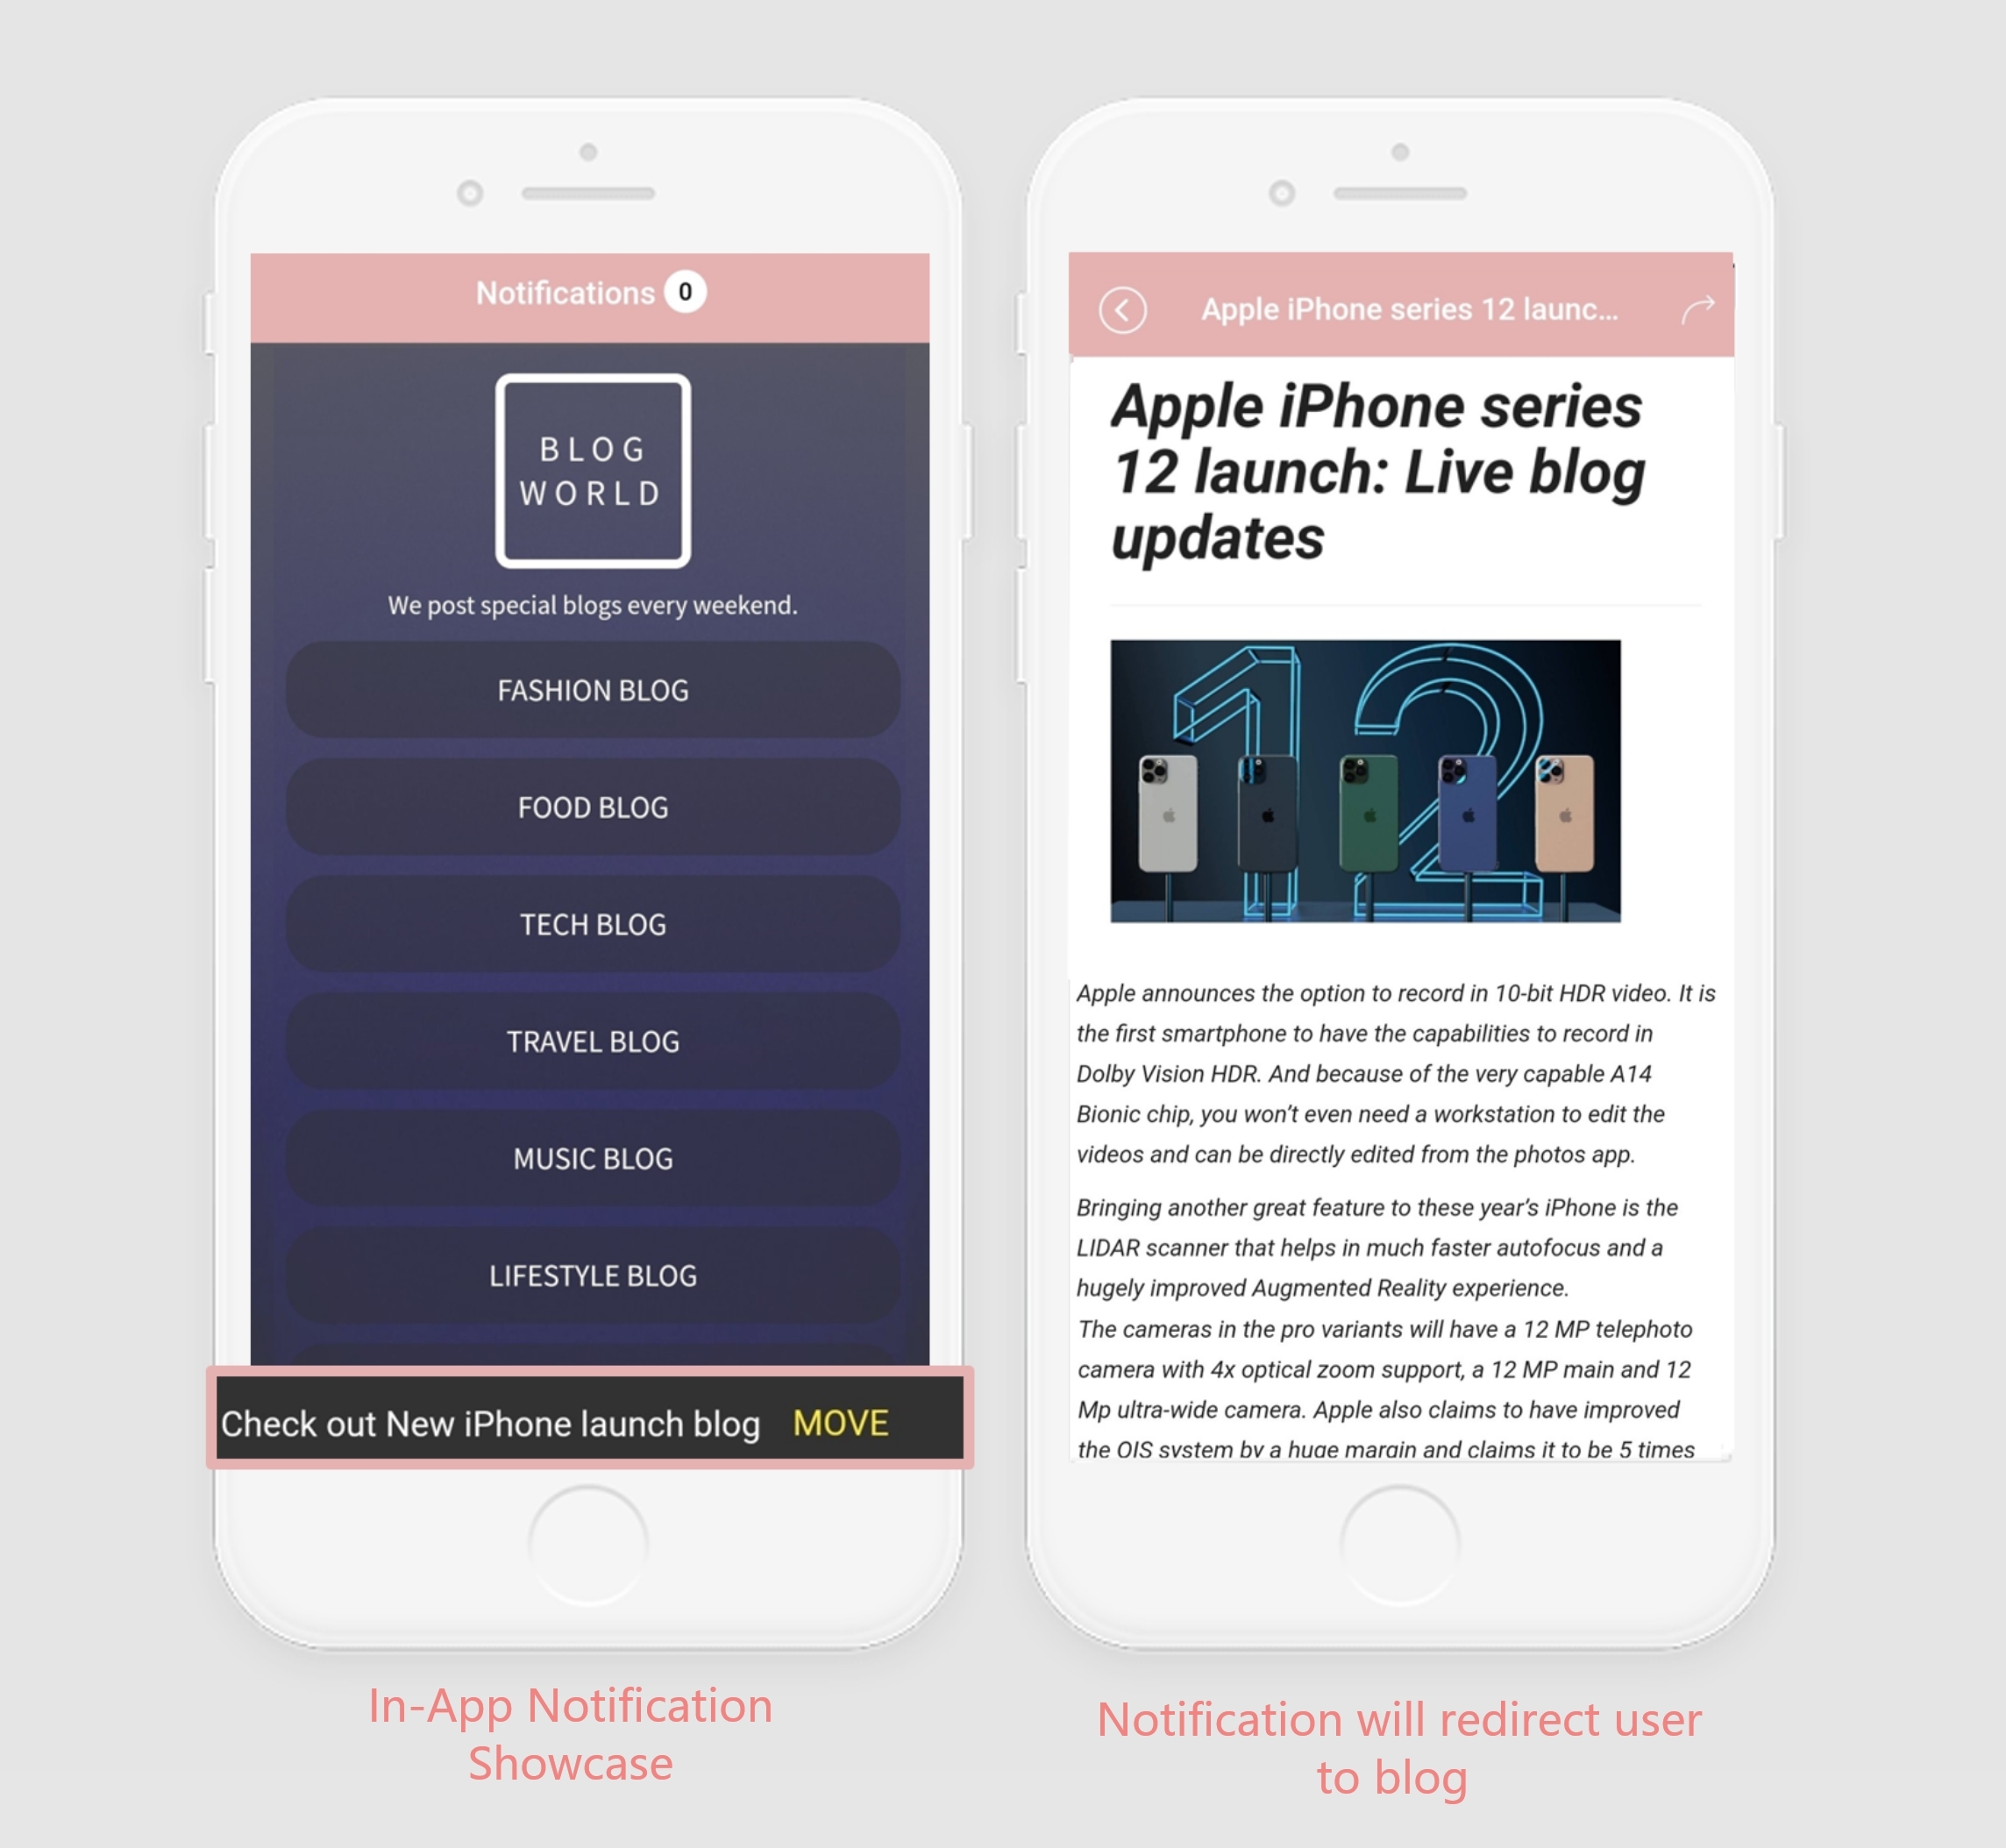
Once you are through this process, this is how the end result will look on users’ screens:
Take away from the use case:
- Push notifications enhanced engagement of the business/app
- Personalized content for notifications promotes higher retention rates
- Helps target different demographics
- Allows business to opt for a proactive approach rather than waiting for users to use the app on their own
Use Case 2: E-commerce App
E-Commerce or m-Commerce mobile apps are a marketplace for people to sell and purchase goods.
Among a myriad of functions, one of the crucial features is to alert and update the customers about various types of discounts, sales, and campaigns going on the platform.
To attract users, push notifications will help them become aware of your services on time. This way, they can avail of what you offer on your app. These notifications can be repeated and pre-scheduled as well.
Check out tutorial for it:
The above image shows the level of customization available to the admin. They can repeat and schedule the same or different push notifications depending on the requirements.
For instance, here the admin wants to notify the users about a week-long sale. The first notification would be sent before the starting date ( two or three days prior). The second notification would have to be set in advance for the last day. The admin can select the date and time for intended push notification via the ‘Repeat’ setting option.
To constantly keep the users in the loop and eager for their services, the admin will schedule third, fourth, and so on notifications as often and as much as required.
How to repeat and schedule push notifications?
Type 1: Repeat and schedule before the event
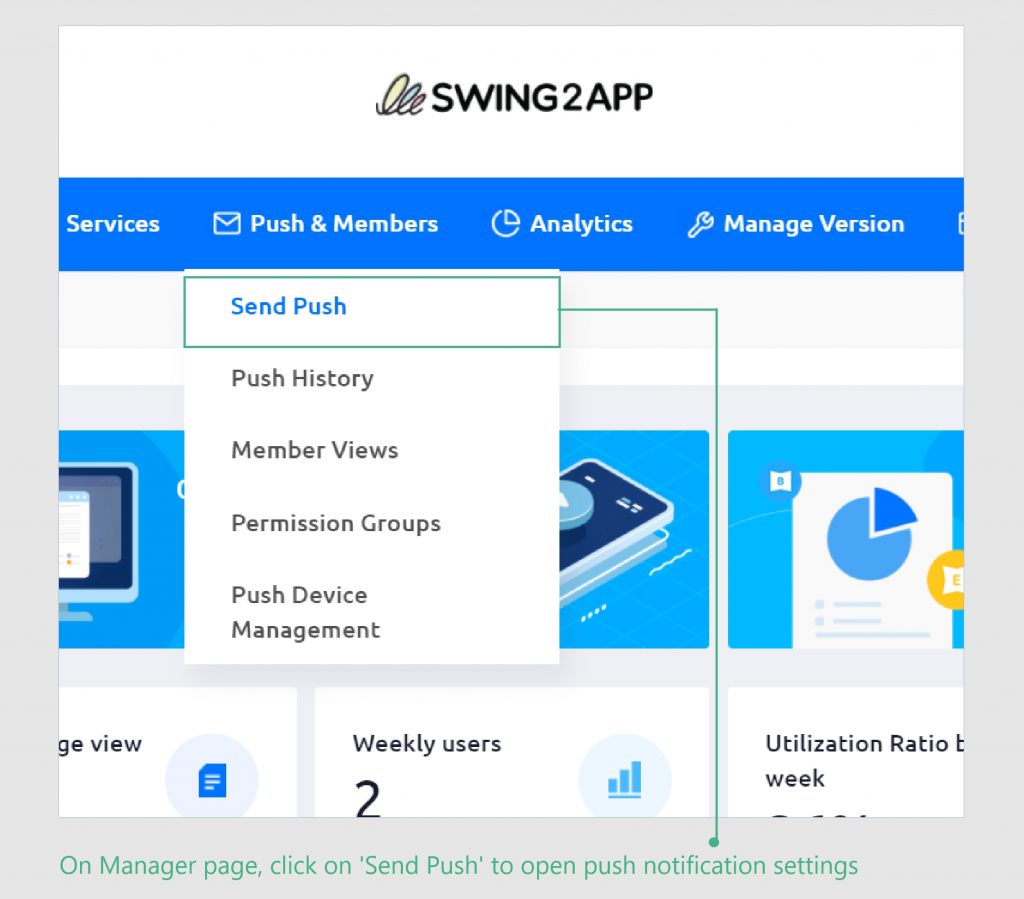
- Once you are on the ‘Manager Page’, select the option ‘Push & Member’.
- Then, choose the ‘Send Push’ option.
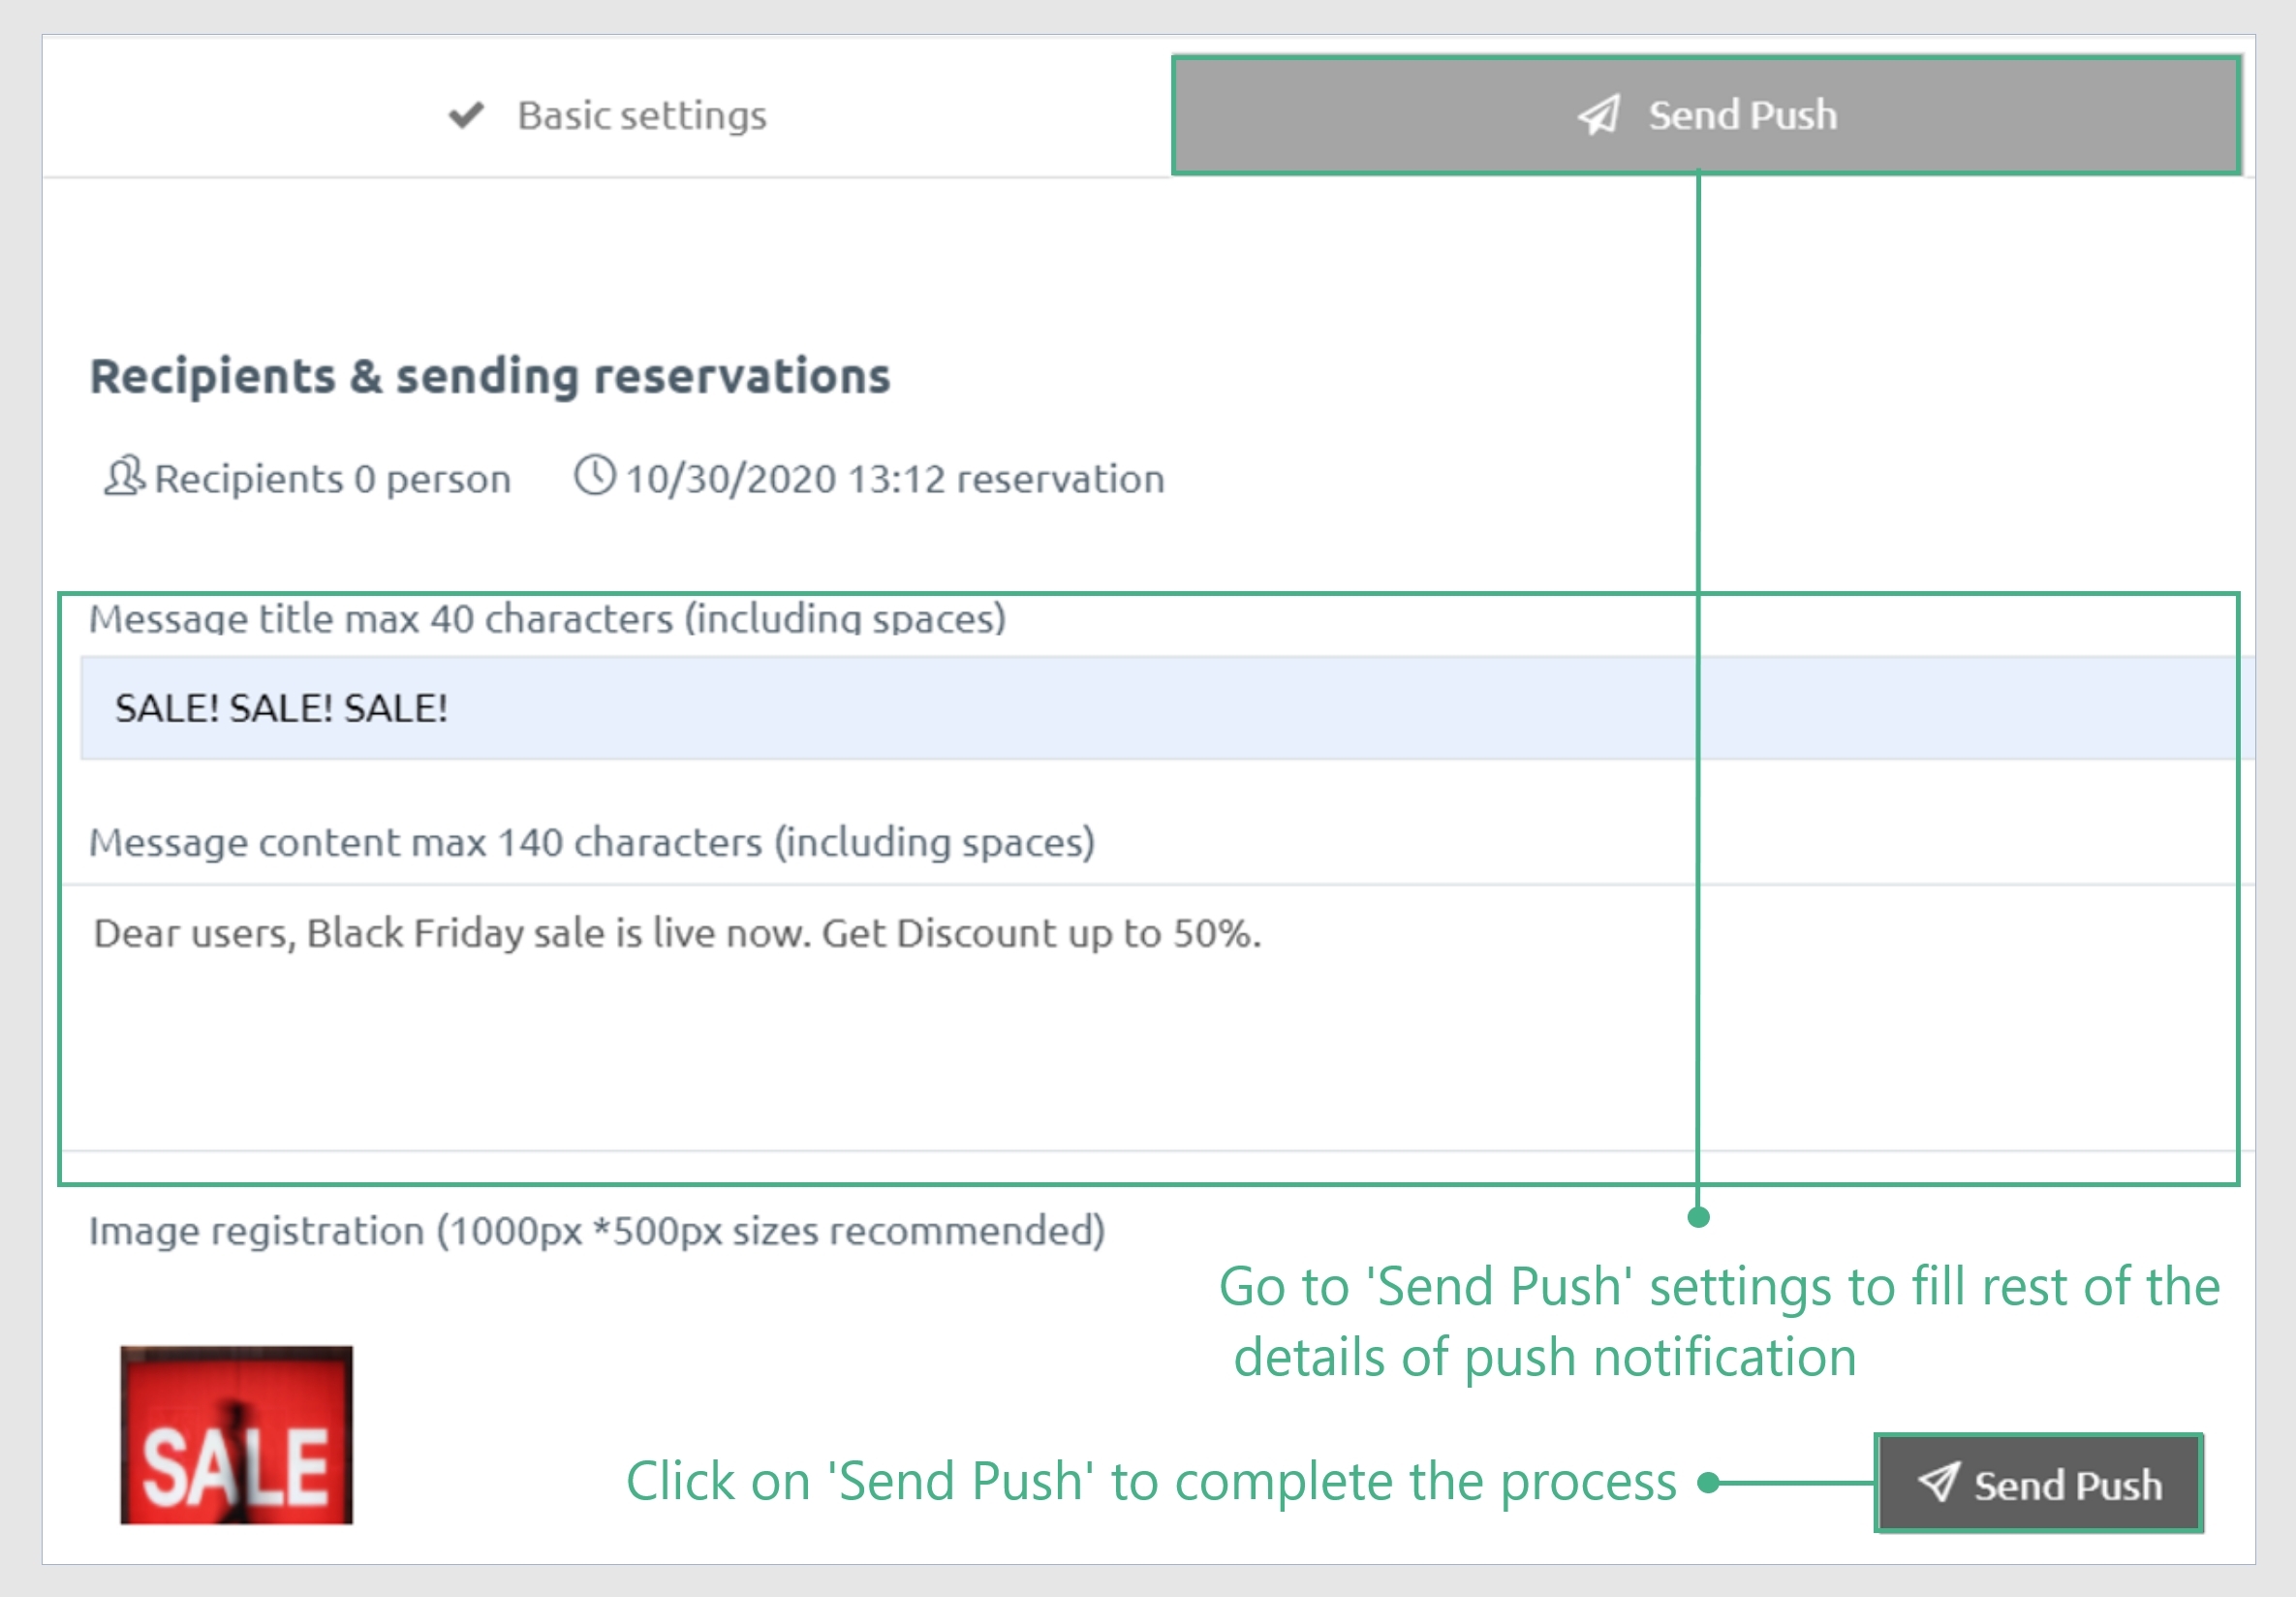
- The admin would have to fill in the required data such as engaging content.
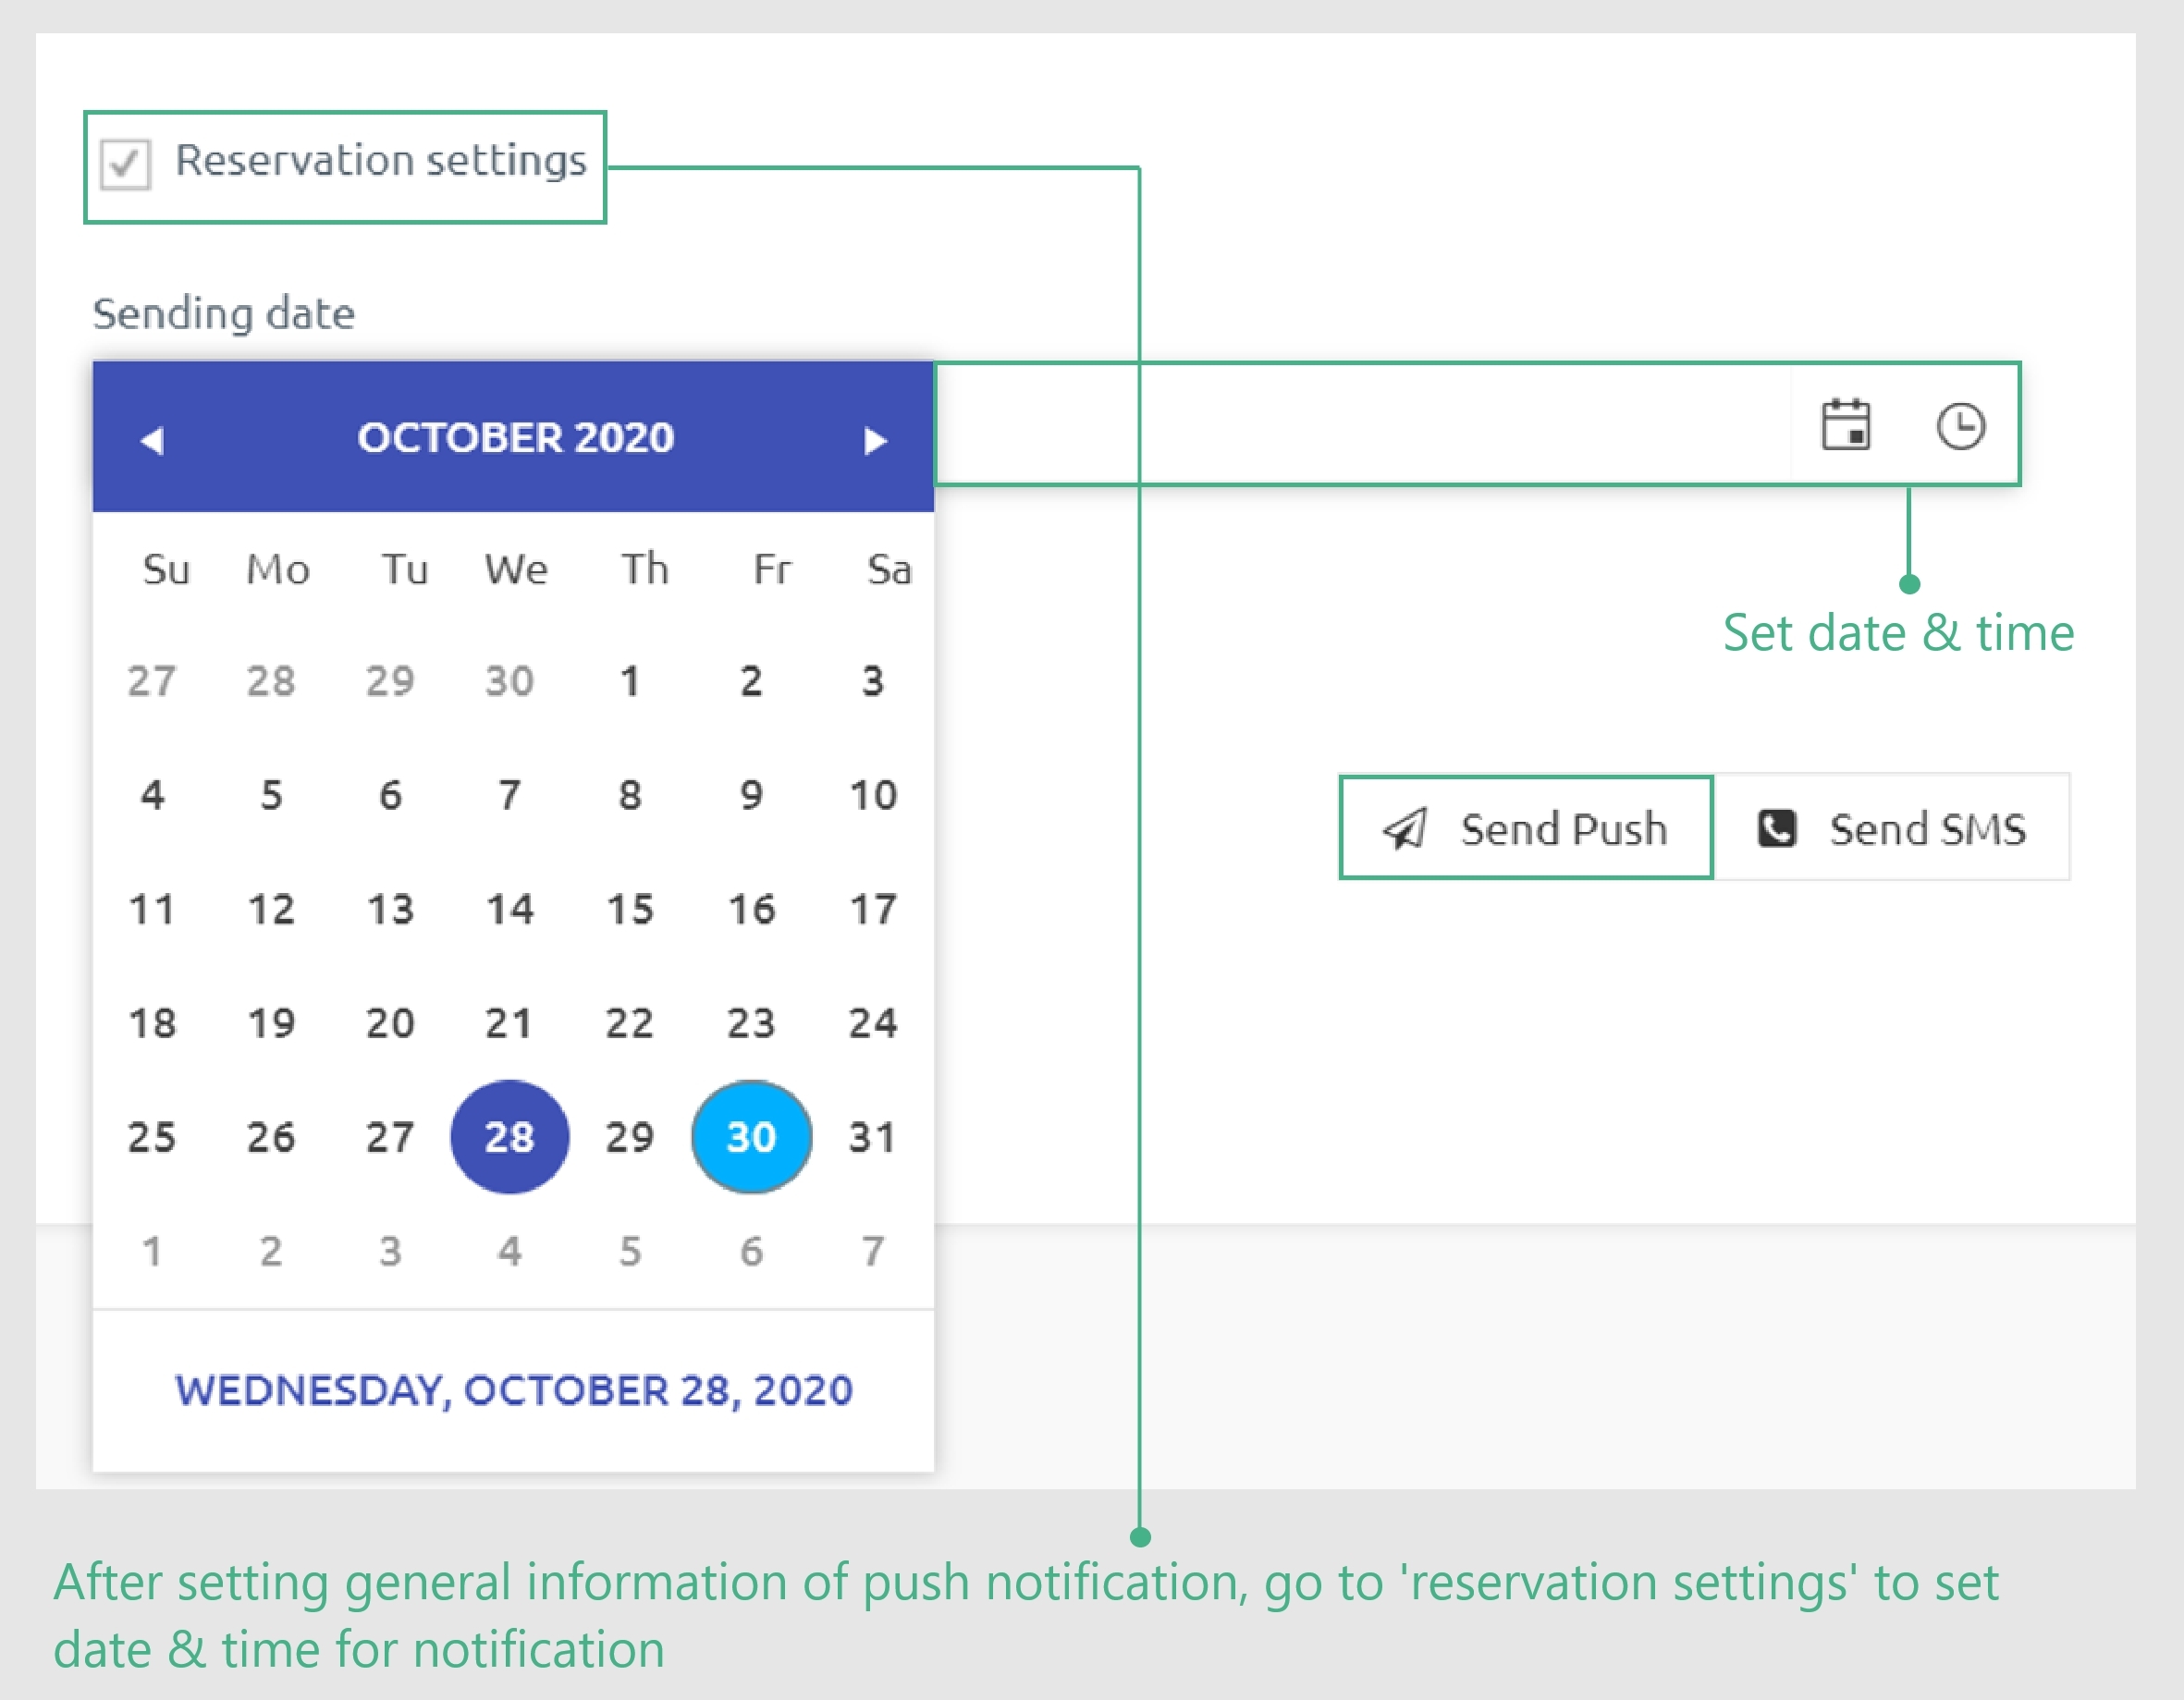
- This is followed by a ‘Reservation’ check box.
- Now, all you need to do is choose the dates of schedule and time for notifications.
- To complete the process, select ‘Send Push’ and Voila!
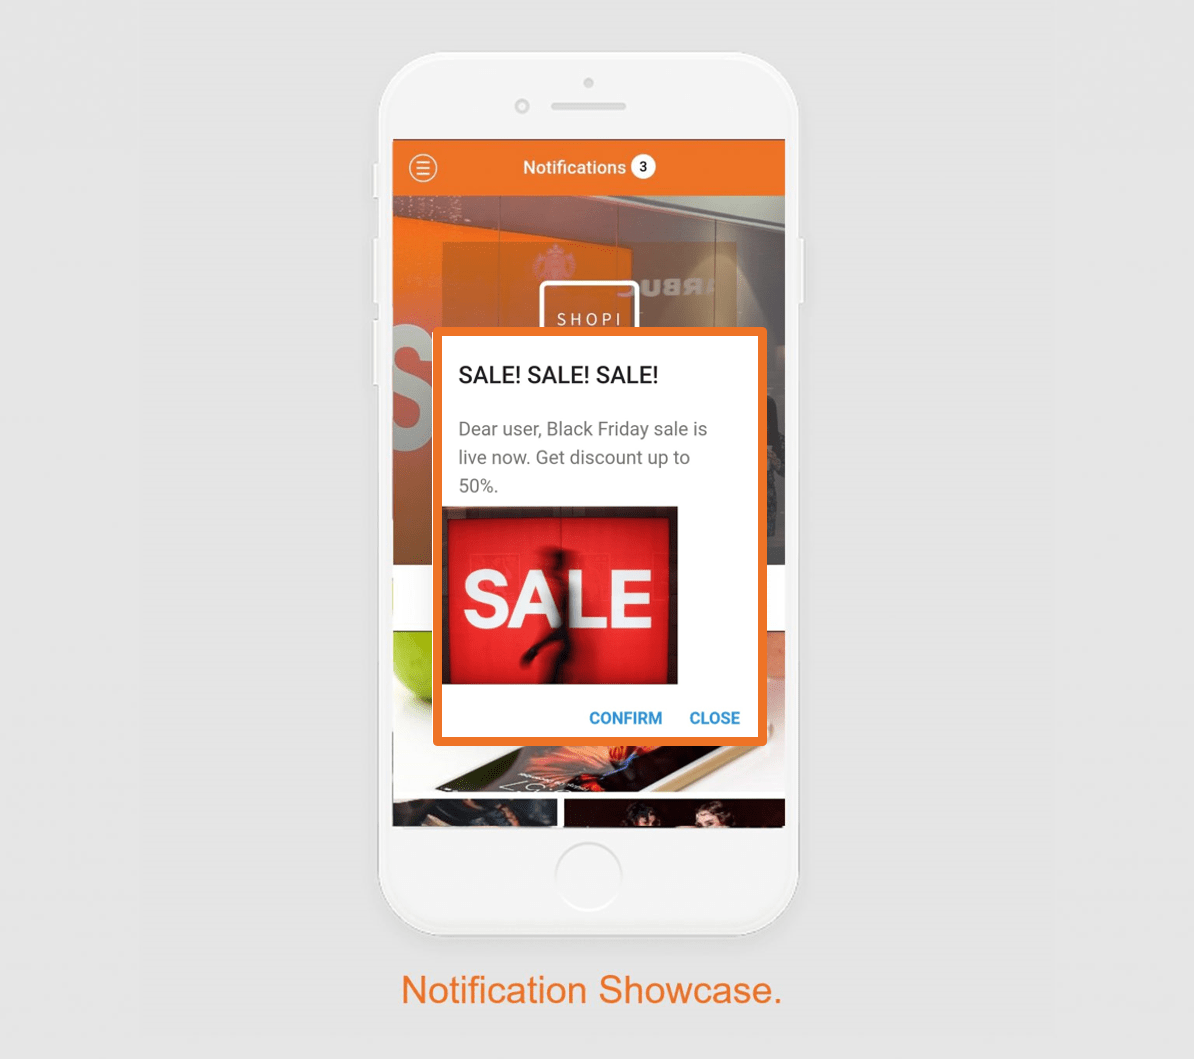
This is how the user will see the scheduled push notification-
Type 2: Schedule for an on-going event
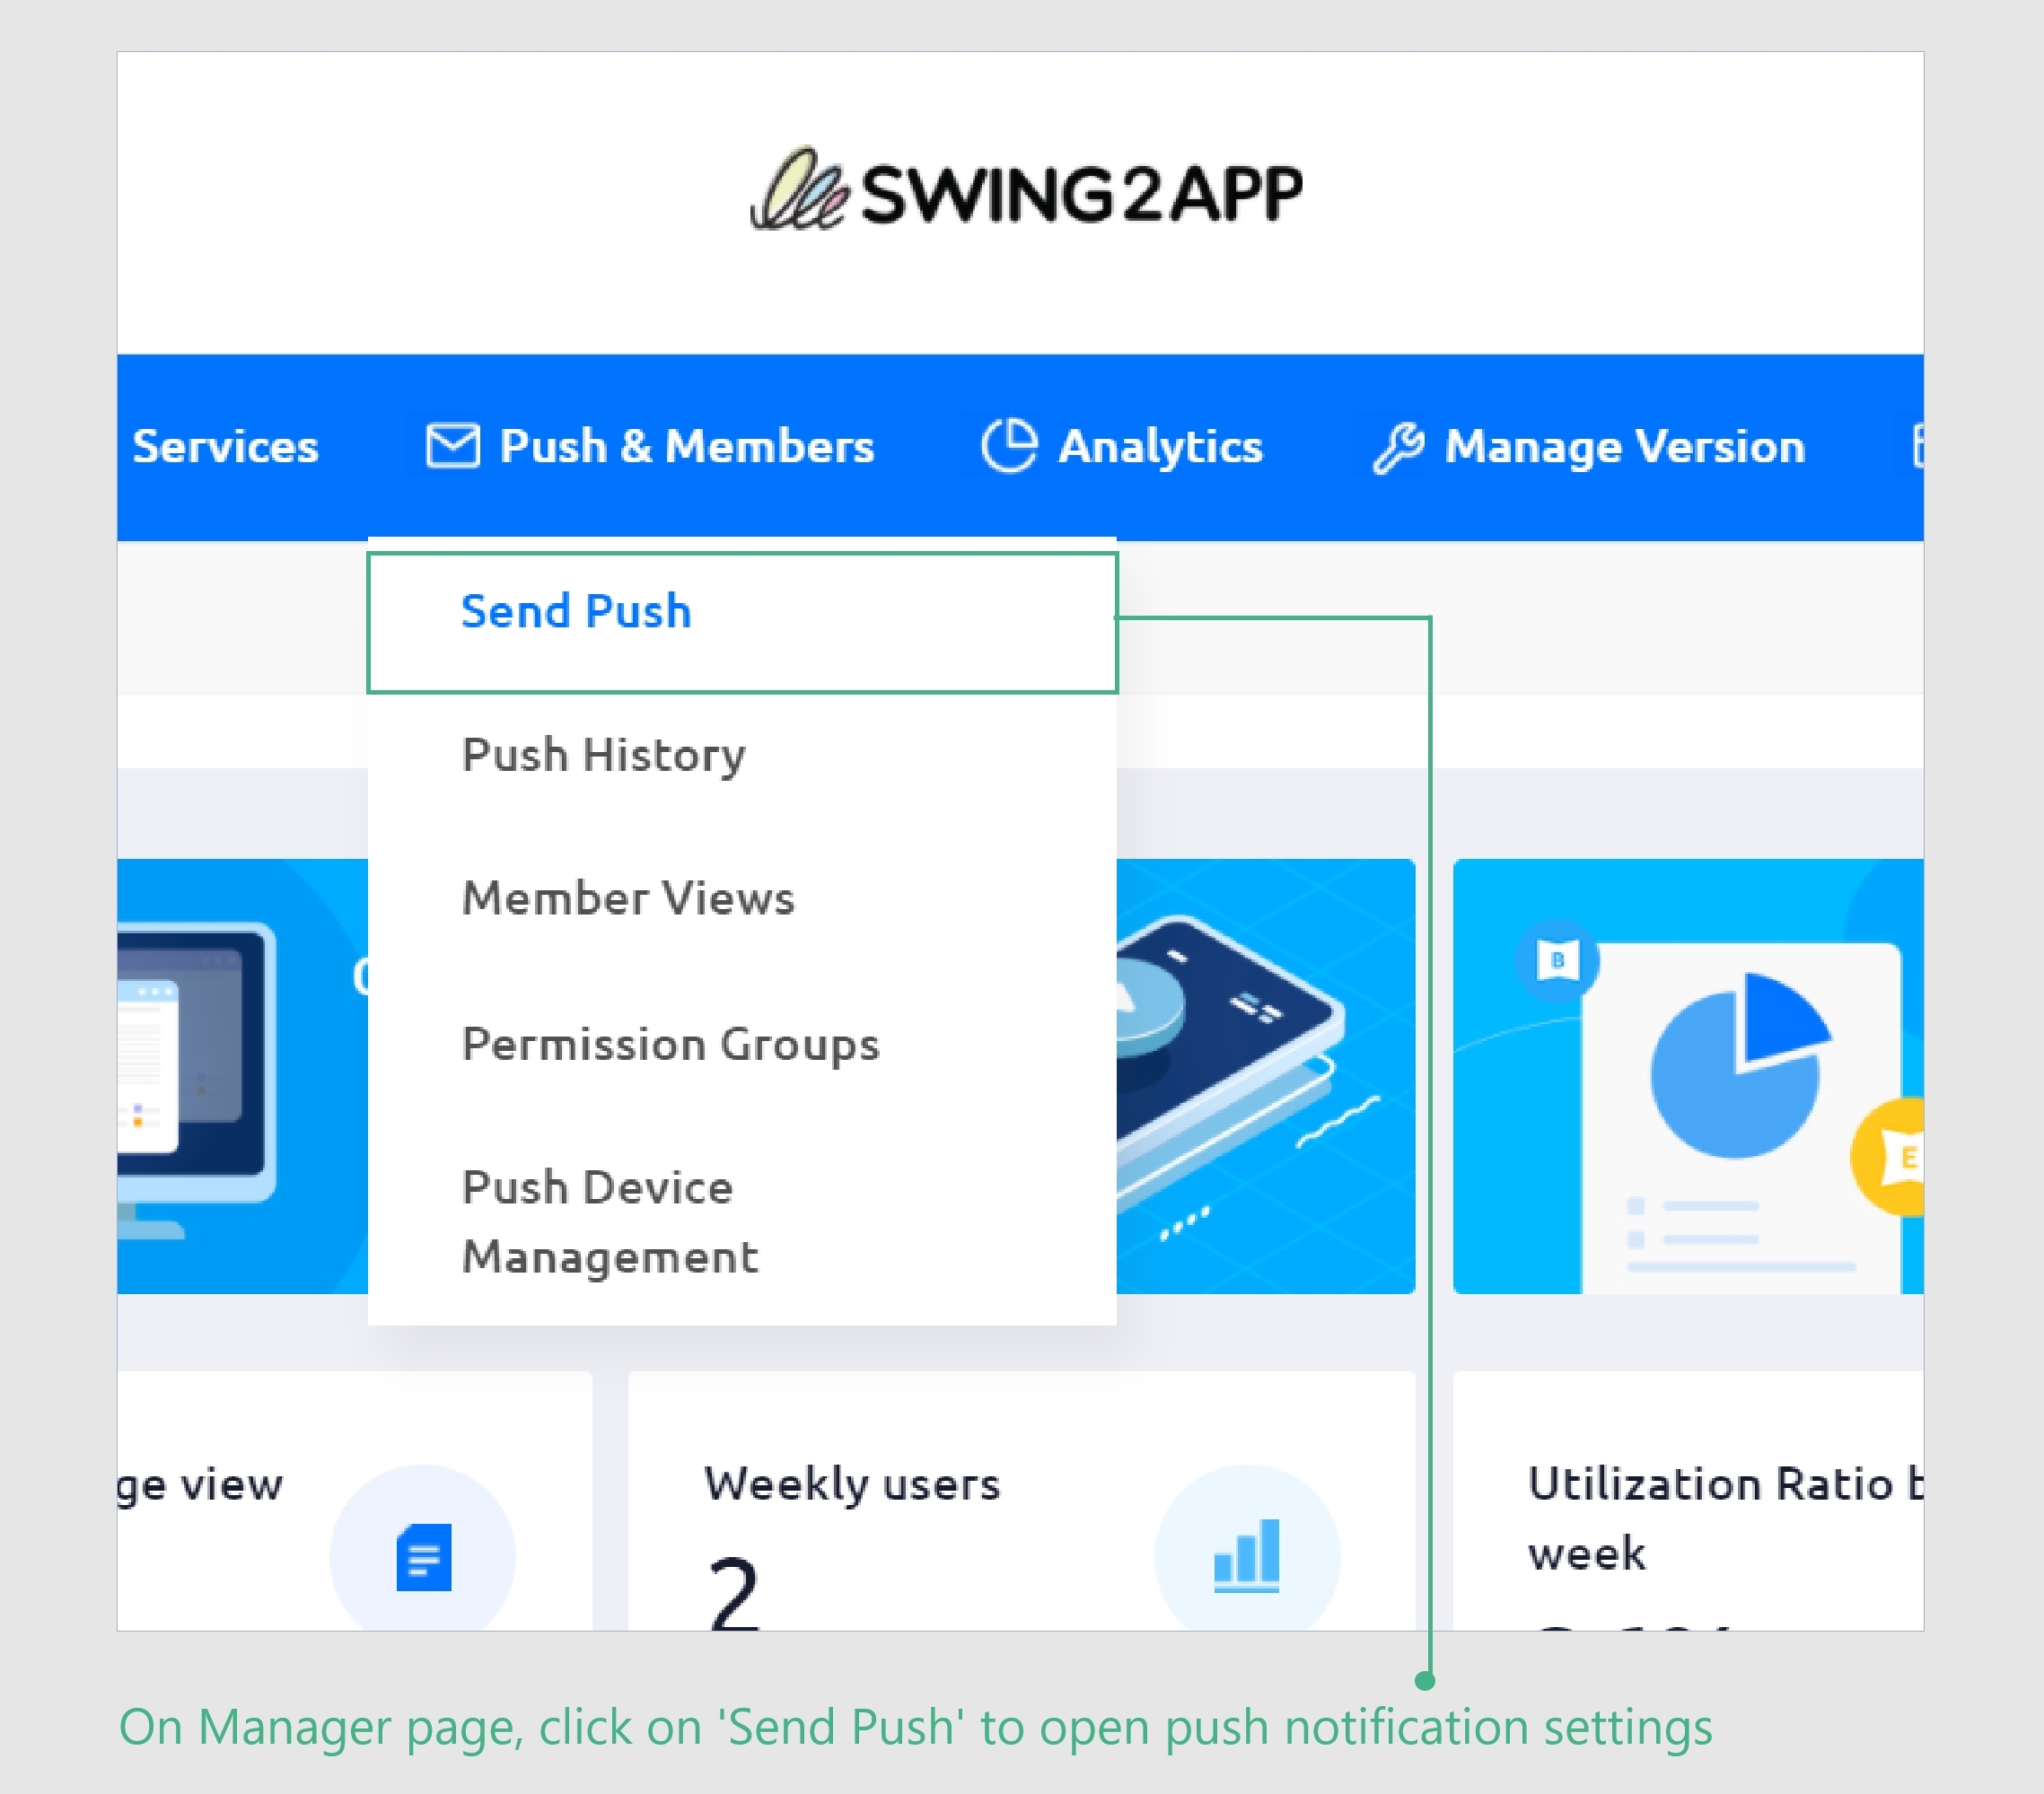
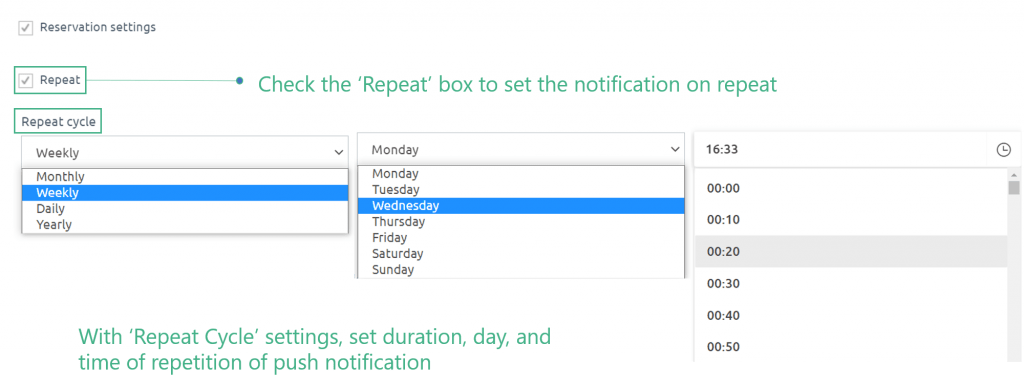


- On ‘Manager Page’, go to ‘Push & Members’ and select it.
- Now, choose the ‘Send Push’ option.
- After filling the required push notification data, click on the ‘Reservation’ check box.
- Now, choose the ‘Repeat’ checkbox to set the duration and amount of repeated notifications required.
- Now, unlike the TYPE1 notification, we need to set the end date for repeated notification reminders since the event is on-going. To that end, click on the ‘Unlimited’ check box.
- Click on the ‘send push’ button.
This is how the notification would look like to the users-

Take away from the use case:
- Push notifications are highly customized since they can be scheduled and repeated for as many times as required.
- Help keep the targeted customers in the loop regarding an event to keep them engaged.
- Promote instant engagement at the time of any event by creating awareness before it begins.
Use Case 3: Restaurant App
There are multiple types of restaurant apps and each can have a different set of functions to play. Thus, the features for each app would be different just like the push notifications.
In our use case, the admin of the app wants to send updates to the customers about the launch of a new Halloween special menu.
To express the occasion creatively, the admin can use the Link wizard tool to make the push notifications content more media-rich and attractive including bulletins, user page, links, and Swing functions.
Check out tutorial for it:
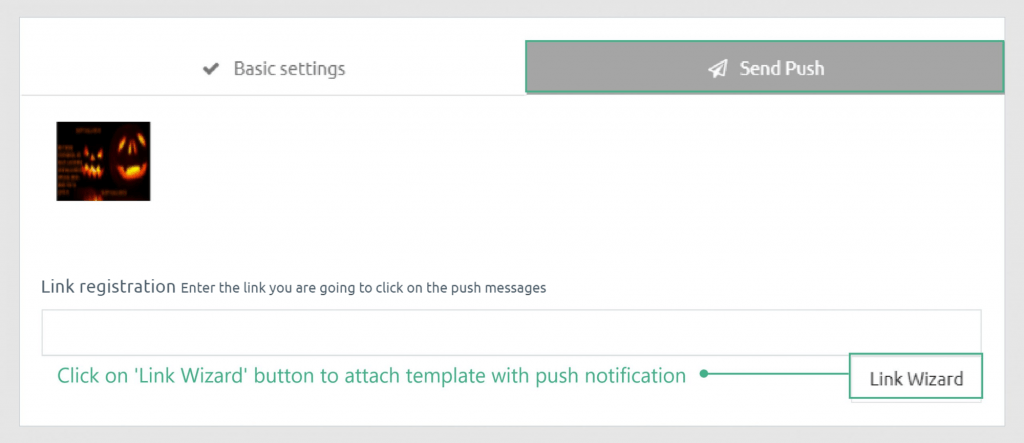
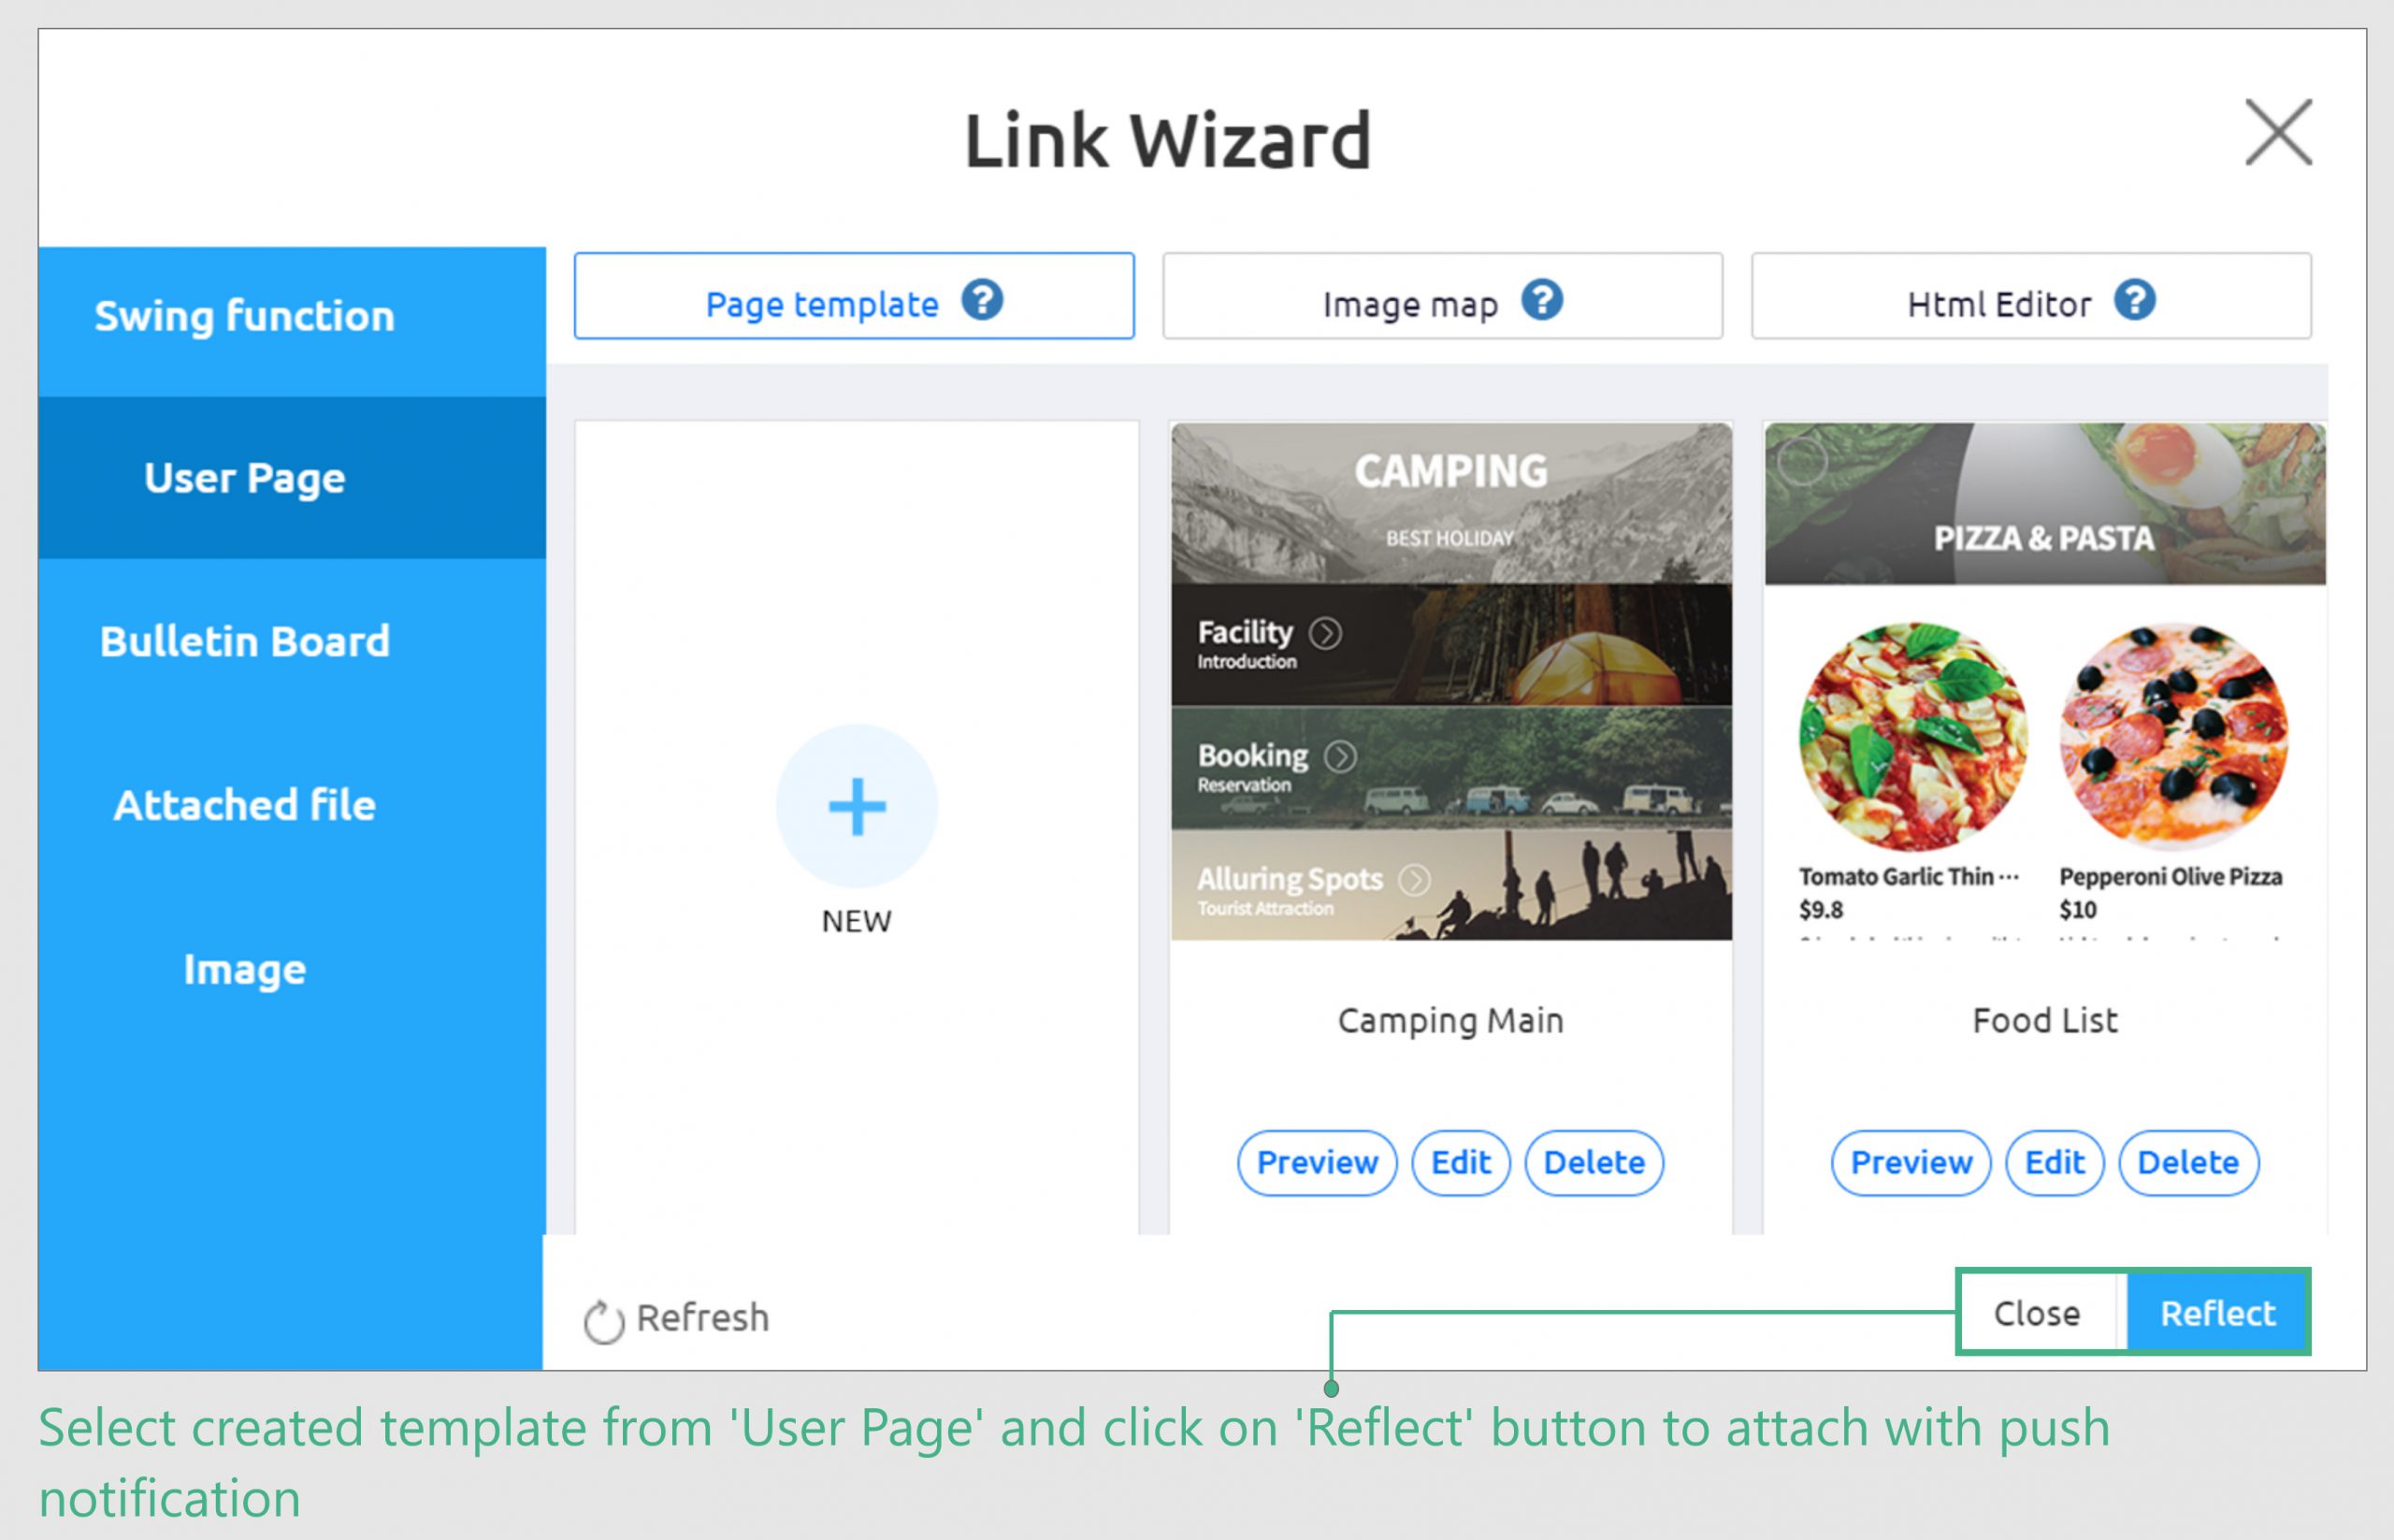
In the image above, we can see that the admin has attached a link of the menu template with the push notification.
How to attach a template with push notifications?
- On the ‘Manager page’, go to the ‘Push & Member’ option and click on ‘Send Push’ option.
- Now, select the ‘Link Wizard’ button and then click on the ‘Users Page’.
- Now, the admin can choose the type of template they want to attach and click on the ‘Reflect’ button to do so.
- Fill in the required push notification data and click on the ‘Send Push’ option to send the update to the users.
The finalized result will look something like this on the users’ screen –
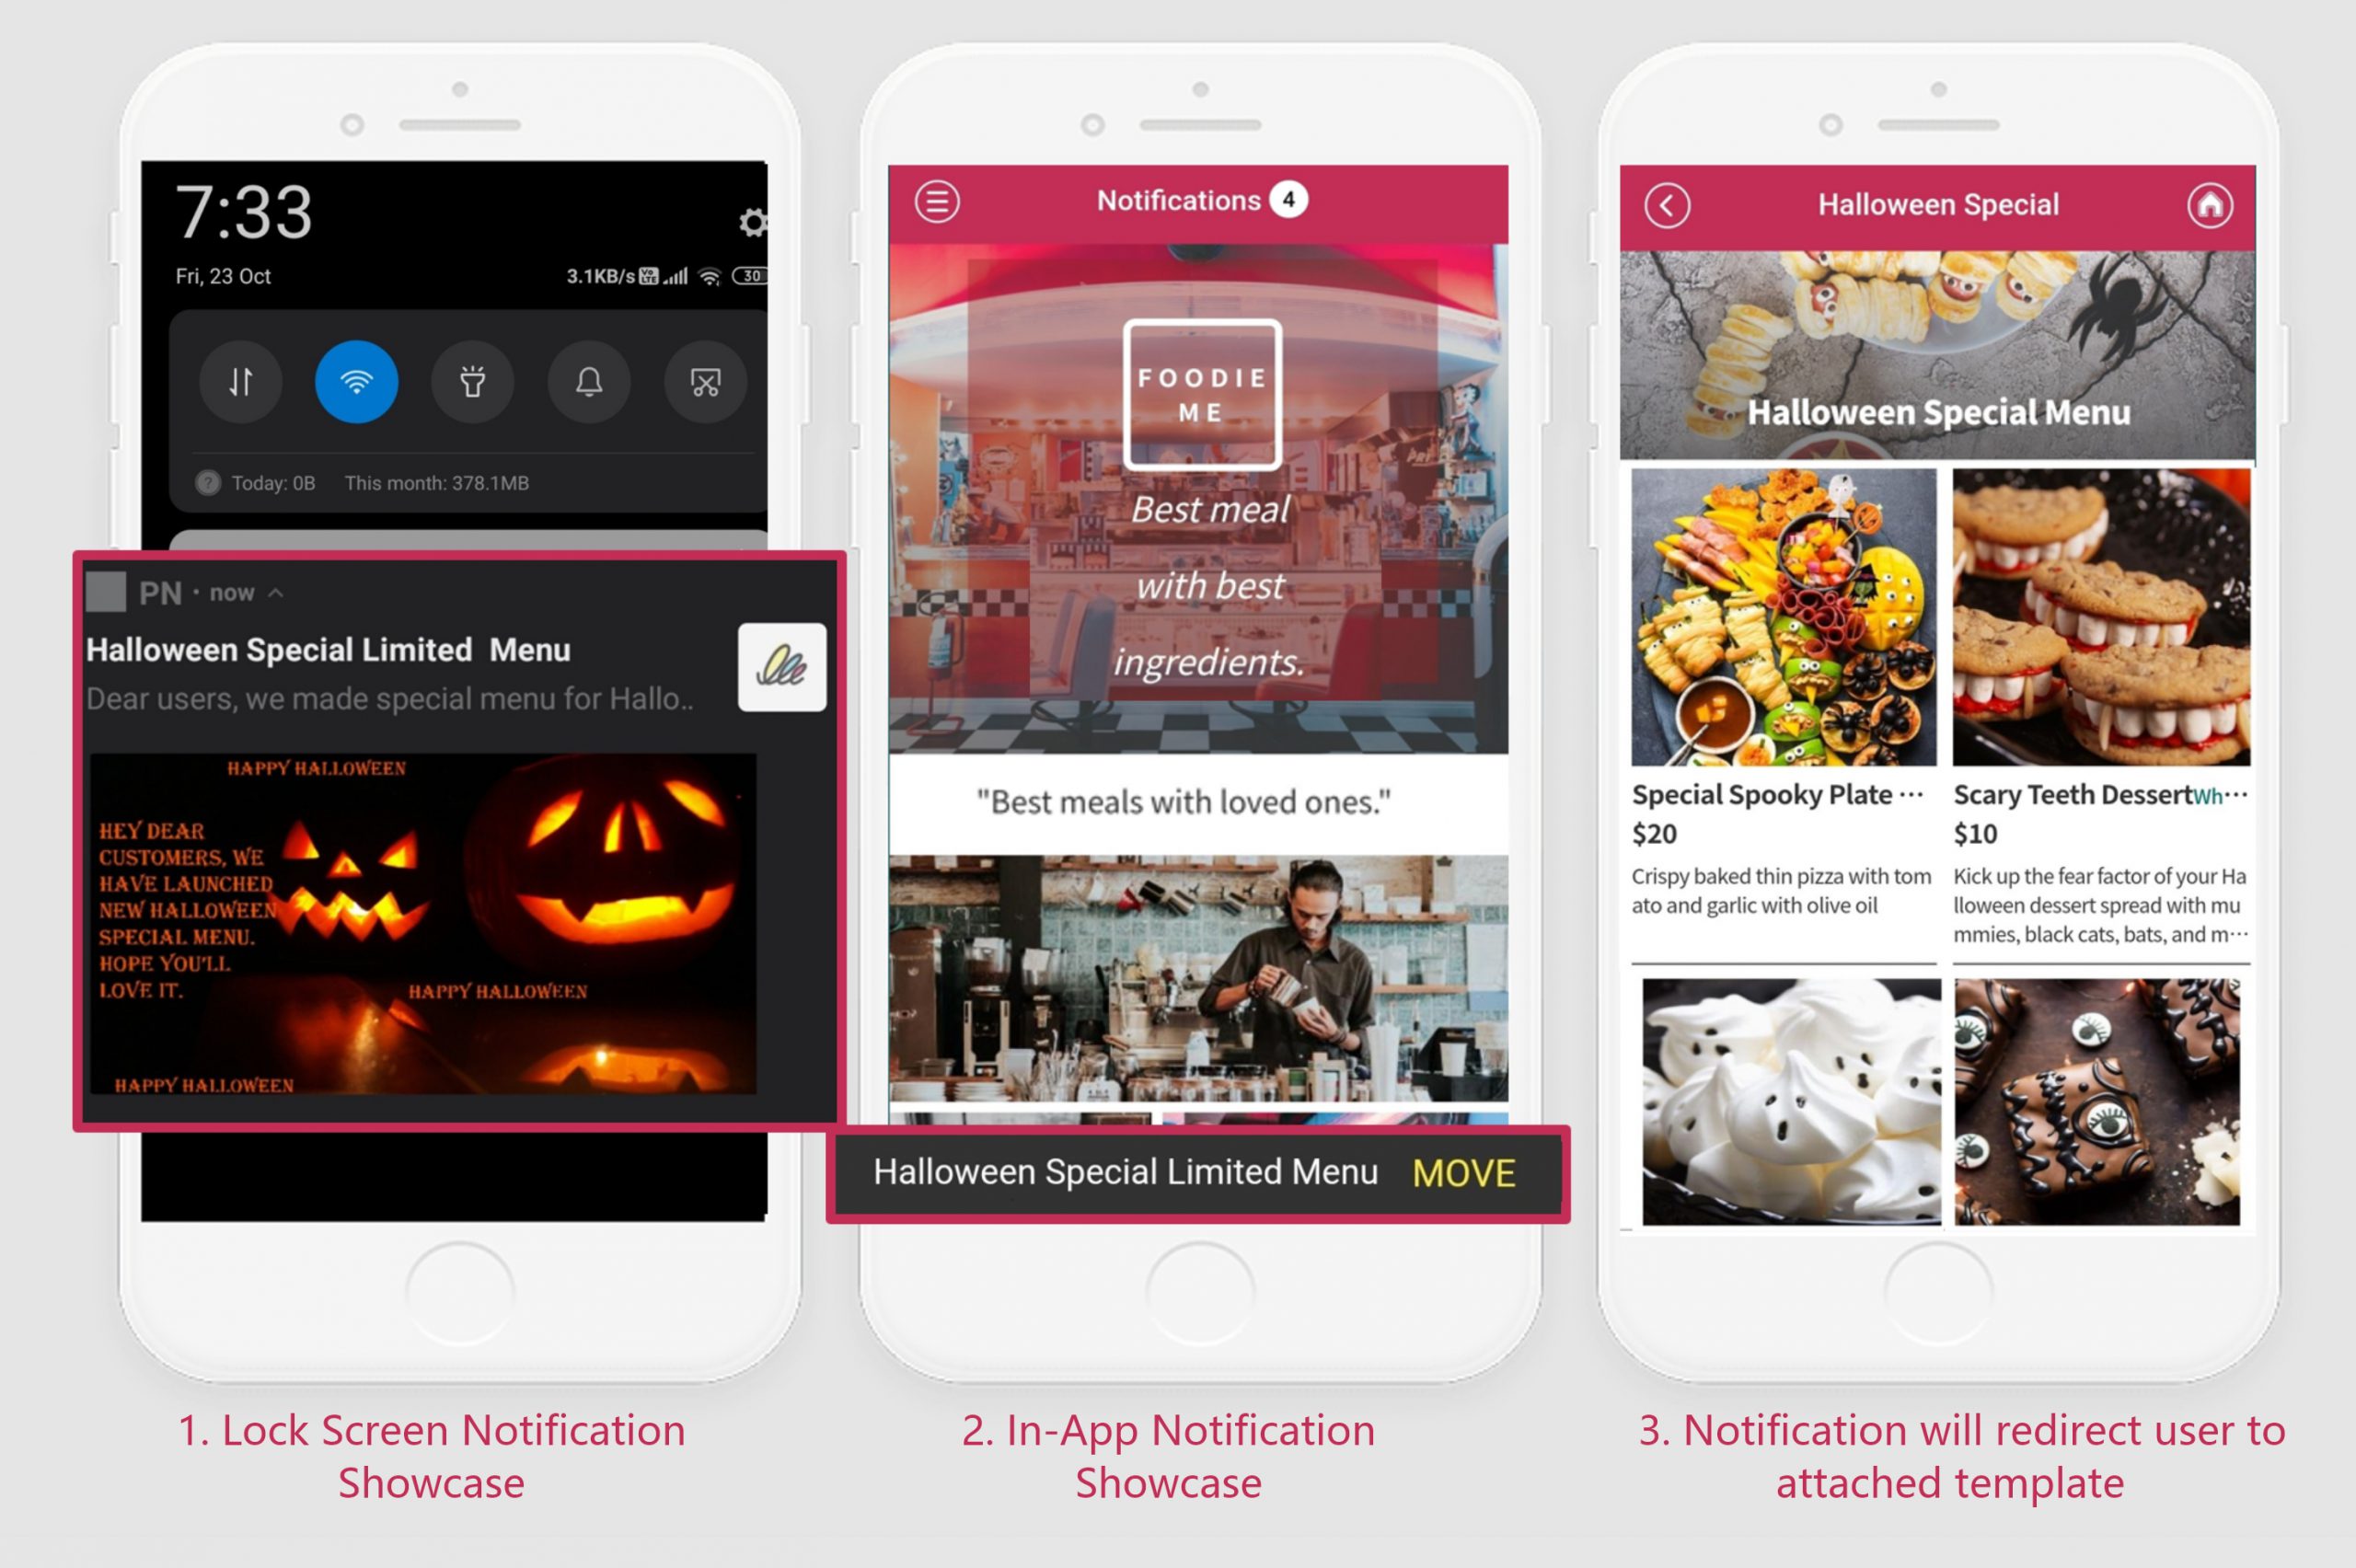
The users would be redirected to the template link upon clicking on the notification. For example, the first notification indicates how users will receive the notification, if they click on it, they will be redirected to something that looks like the second screen.
Key Takeaways from the use case:
- Push notifications can be made more engaging using media-rich content to increase click-through rate on notifications.
- Notifications can be made interactive with templates, bulletins, links and more.
- You can also attach links to the push, which will take users directly to that page.
- Concise & attractive push notifications provide better customer engagement than plain texts.
